First Year Care of Your NUC
Starting Out
First, educate yourself! A honey bee colony is a living animal that deserves to be cared for properly. You are beginning beekeeping at a time in which honey bees are struggling to stay alive–beekeeping is more difficult than it was prior to the parasitic varroa mite (which invaded around 1990). Although honey bees are essentially wild animals living in a box provided by their “keeper,” bees are in the midst of an evolutionary struggle due to the introduction of varroa (which completely changed colony stress and virus dynamics), as well as that of Nosema ceranae (an opportunistic parasite that can cripple a stressed colony). In addition, the bee population now faces the additional novel stressors of persistent European foulbrood, loss of forage in many areas, the effects of climate change (shorter winters), and pesticide exposure.
It is more difficult to keep healthy bees than it is to care for most common pets (for which you generally need only to provide food). The more you understand the biology of colony health and dynamics, the more successful you can be at beekeeping. Bees see and respond to the world (environmental cues) very differently than do humans. In order to be a better beekeeper, I suggest that you try to learn to see the world through the eyes (and antennae) of the bee, and to “think” as does the honey bee superorganism.
What is Your Motivation?
Please allow me to be frank. If your motivation is to “save the bees,” please realize that the honey bee is in absolutely no danger of extinction. Caring for a hive of bees requires several hours of husbandry a year, involving opening and inspecting the frames inside, and getting stung. Keeping your bees alive and healthy these days requires management for the varroa mite–most beginners fail at this, and their colonies die an ugly death.
So if your motivation is to help the bees, unless you’re willing to provide a hive with good husbandry, you’d do more service to bees, other pollinators, and the environment by planting flowers and flowering shrubs and trees, supporting small farmers, buying local produce, minimizing your carbon footprint, and telling your representatives to support the EPA.
On the other hand, the keeping of honey bees offers one a “tangible connection to the wild.” If you’re willing to make the effort, the honey bee can help to connect you to Nature, and to the joy of experiencing how this fascinating social insect manages to eke out a living.
“Treatment-Free” Beekeeping
I kept bees “treatment-free” for two decades prior to the arrival of varroa, and my goal is to be able to do so again in my lifetime. Towards that end, I am a huge proponent for breeding bees for the traits involved in natural resistance to varroa, and am seriously involved in my own breeding program. That said, most lines of honey bees today will succumb to the varroa/virus complex within a year or two of starting the hive, unless realistic measures are taken by the beekeeper to reduce the mite population. Please read my article “The Varroa Problem Part 6b–Small-Scale Breeding,” in which I discuss some of the misconceptions often advocated by well-intentioned (but biologically misinformed) “treatment-free” promoters.
If you have an isolated apiary, or are fortunate enough to get a queen with the right genetics, your colony may survive without treatment. Sadly, this generally does not happen, and most beginning beekeepers lose their colonies to varroa. This is completely avoidable, and can be avoided by regular monitoring of your hive for its degree of varroa infestation by alcohol wash (my preferred method) or a well-done sugar shake. If thus indictated, there are a number of safe and effective (and organically-approved) products that can be used to reduce the mite population (detailed further down).
Books
There are several good beginners books.
- First Lessons in Beekeeping, Dadant. Standard beginner reference.
- The Beekeeper’s Handbook by Diana Sammataro & Alfonse Avitabile. Many recommend this one.
- Beekeeping for Dummies. I haven’t yet read, but several beginners have recommended.
- Honey Bee Hobbyist by Norm Gary — good overall understanding, rather than how-to.
- Homegrown Honey Bees by Alethea Morrison. A fun journal of the experiences of a first-year beekeeper. The author ran it by me for accuracy prior to publication, so good info.
- A Book of Bees, Sue Hubble – beautiful prose about being a beekeeper
And of course, ScientificBeekeeping.com.
Although I have yet to summarize my many articles into a book, I suggest that you familiarize yourself with bees, starting with how the colony manages its labor pool, feeds itself, varroa management, The Rules of Beekeeping, and for a deeper understanding of the biology of the hive over the course of the year, my Colony Buildup and Decline series.
Find a Mentor
Beekeeping is difficult to learn from a book, and the proper handling of bees to avoid excess stinging even more difficult. The best thing to do is to get over the innate human fear of bees and of being stung. Bees sting. You want to keep bees. You’re gonna get stung, so get used to it! Experienced beekeepers generally feel that a regular dose of bee venom improves their health and well being.
Hive Inspection
I strongly suggest that you find a mentor who can demonstrate handling technique. Find a mentor who does not normally wear gloves or much protective gear. You want to learn to approach your bees in a cooperative mindset, rather than an adversarial approach. If you learn while fully protected with gloves, you will get bad habits, as it prevents the bees from giving you “reminders” that your technique is sloppy or disrespectful to the hive.
Hive inspection on sunny days should involve minimal stingings, but I’d shoot for several dozen stings a season in order to avoid sensitizing yourself to bee venom (beekeepers who receive only a few stings a season set themselves up for true bee sting allergy late on). Learn to use smoke gently but appropriately. Move as though you are practicing Tai Chi–no sudden movements. The point is to avoid going past the bees’ threat response threshold. At that point they will start giving you “warning bumps” or stings. Learn to recognize those warnings.
Equipment
You’ll need a veil — I suggest a lightweight hooded jacket
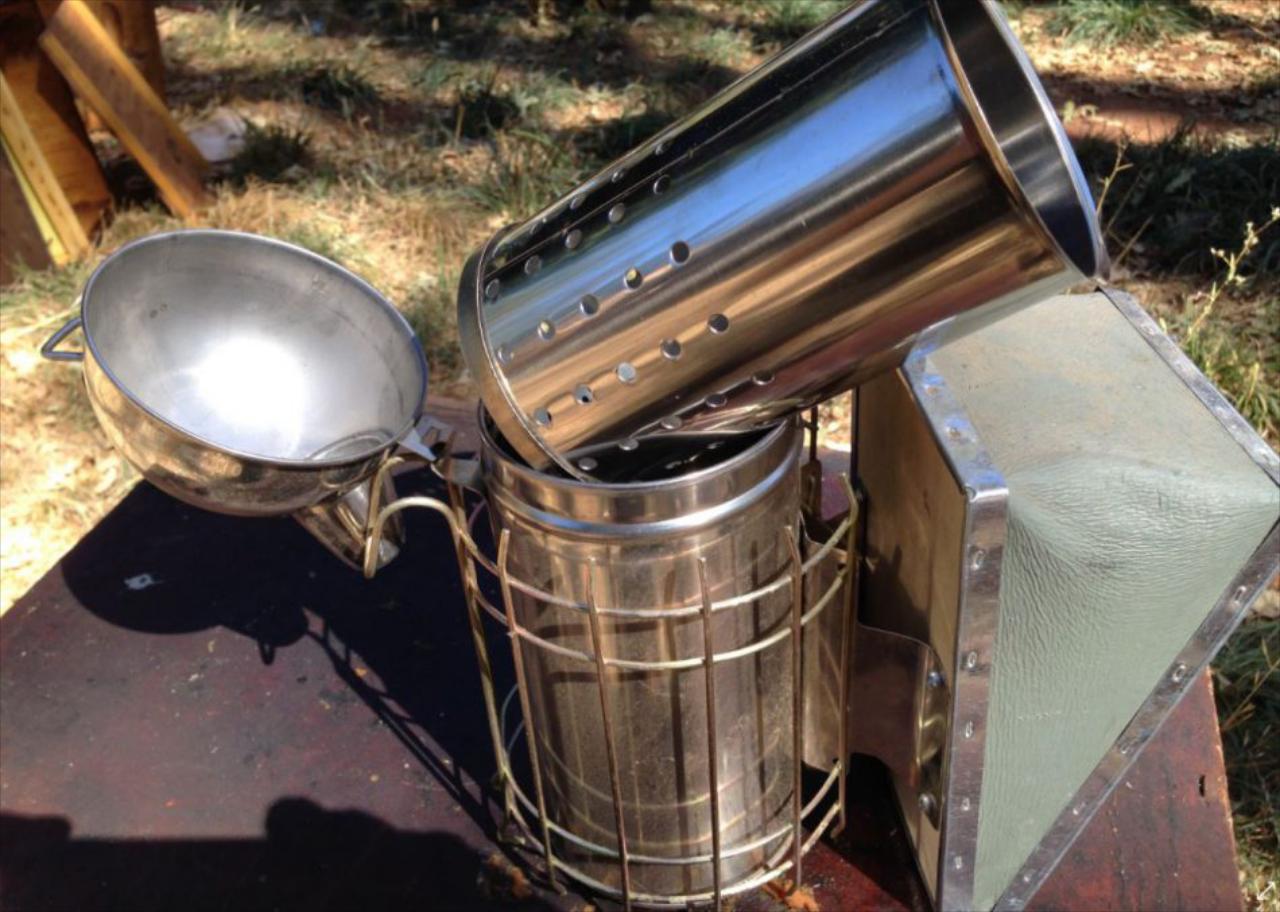
A smoker — As far as smokers, I like a 4″ x 7″ stainless steel, dome top smoker (the better to direct the smoke), with a protective basket around it, with a leather bellows (bellows similar to that shown below). To get this, I usually need to purchase the smoker, and then swap the bellows, since few manufacturers put the two together. Note: I do not recommend the stainless smokers with full inside insert, such as shown below–they do not work well! You want one with the perforated bottom plate with three legs.
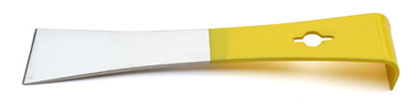
The hive tool — the smoker and hive tool are the only tools that I generally carry (plus a cigarette lighter to light the smoker). I prefer the curved-end hive tools as shown–you can do everything with them, and the curved end is really handy for scraping off propolis, or for prying up stuck frames. I hold my hive tool to use the curved end for prying apart frames, since it gives you more leverage and control. I especially like the Jero brand 7-1/2″ hive tool for summer work when you don’t need a lot of leverage to break the propolis; I use a 10″ tool when it’s cooler. The Jero is the best scraping tool that I’ve found. Caution–Jero’s come really sharp, so first rub the flat end against a rock; leave the curved end sharp.
You will be a far better beekeeper as soon as you learn to work without gloves, but I suggest that you learn to do so by working small colonies under perfect conditions. Under other circumstances try using 5 mil white nitrile, long-cuff gloves.
I’ve been happy with the two brands shown. Each feels a bit different, but I can’t say that I prefer one over the other. These gloves prevent most stings, are long enough to tuck under the cuff of your jacket (I recommend a hooded jacket), and are remarkably durable (I’ve gotten 4 full days of hard work out of some pairs).
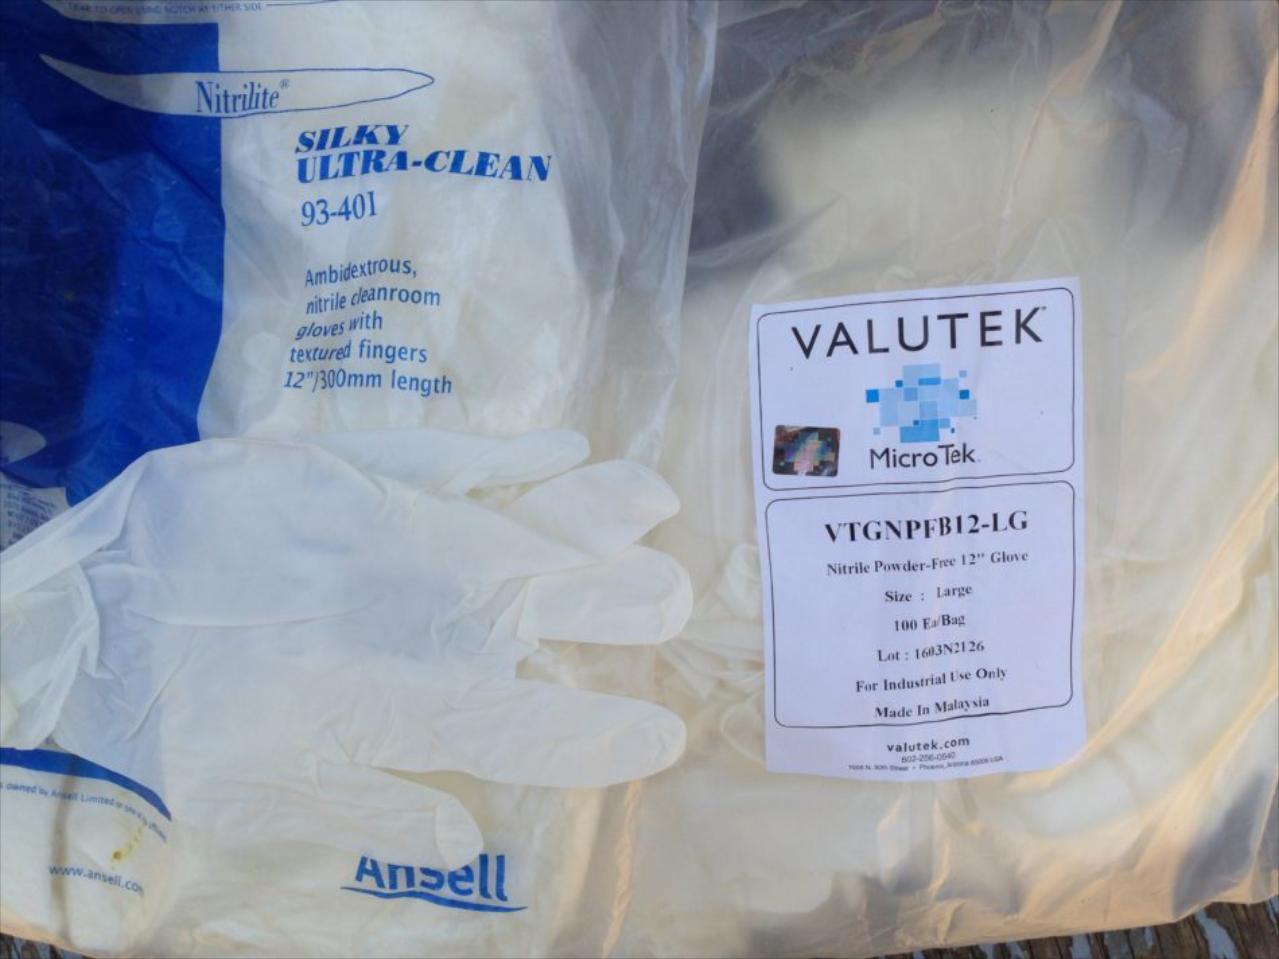
We really like these gloves when we are working bees in cold or rainy weather (we rarely wear gloves during warm weather). I put on a glove during warm weather for the photo above–yes, they get a bit sweaty, but your dexterity is so much better than with leather gloves. If you wish to wear leather gloves, get snug-fitting goatskin gloves.
You do not want to avoid stings–that will only predispose you to eventual bee sting allergy. Working with gloves allows you to get into bad habits–when gloveless, the bees will patiently remind you each time you make a mistake. If you’re getting stung, you’re doing something wrong (this does not apply so much with Africanized bees). It may be hard for beginners to believe, but once your immune system gets used to regular stinging, your body misses it when it doesn’t get its regular doses of bee venom.
Handling Tips:
Smoking the Hive
Forget about going “smoke free”–proper, light use of smoke is the beekeeper’s best tool. You only need to use a little, but apply that little bit immediately upon opening any part of the hive–timing is everything!
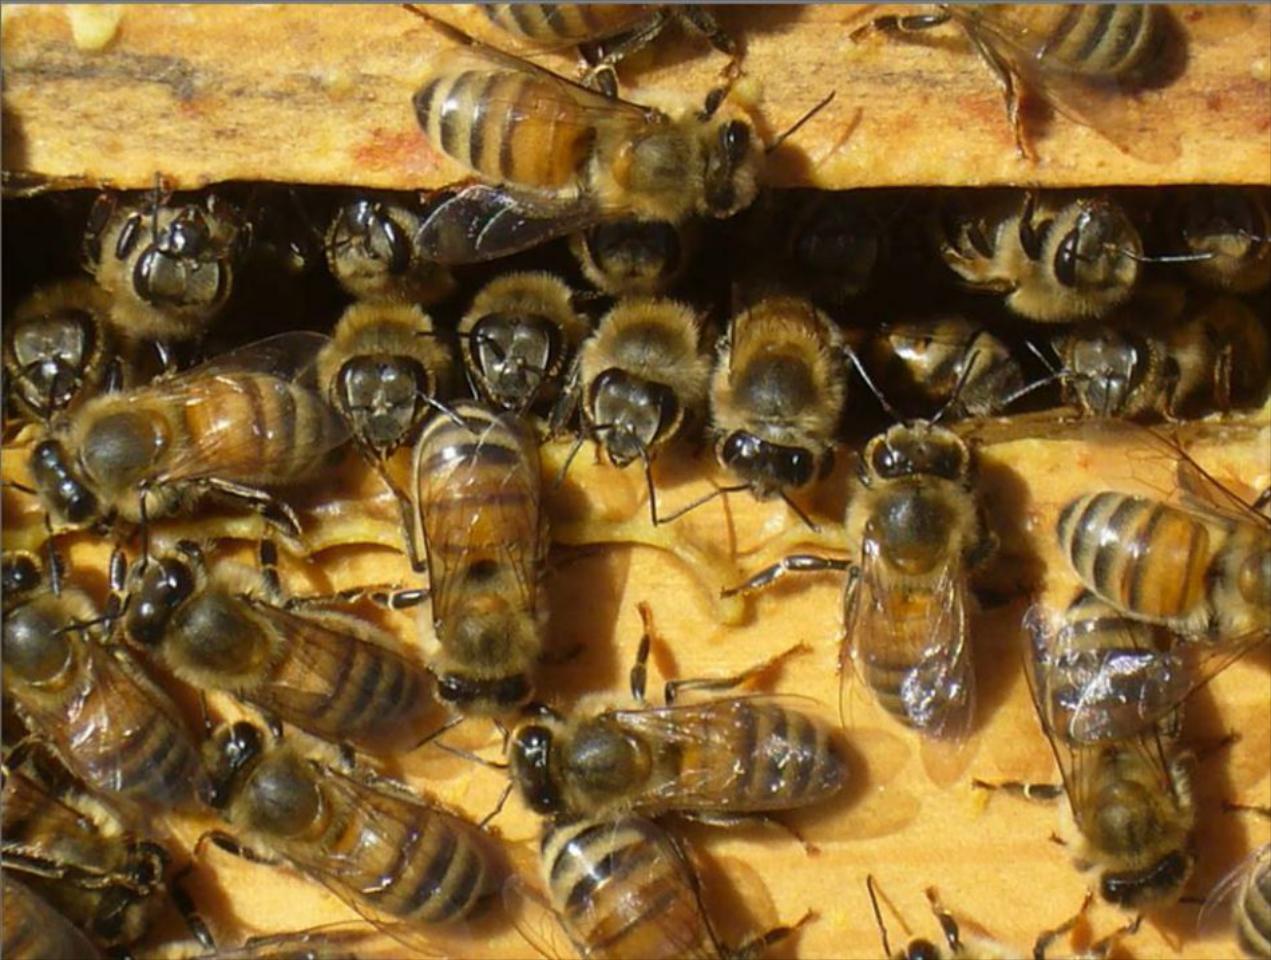
You only need to smoke the guard bees–bees in the middle of the cluster rarely sting–apply gentle smoke to those on the periphery. Look at their “faces”–if they are looking at you, then they are aware of you!
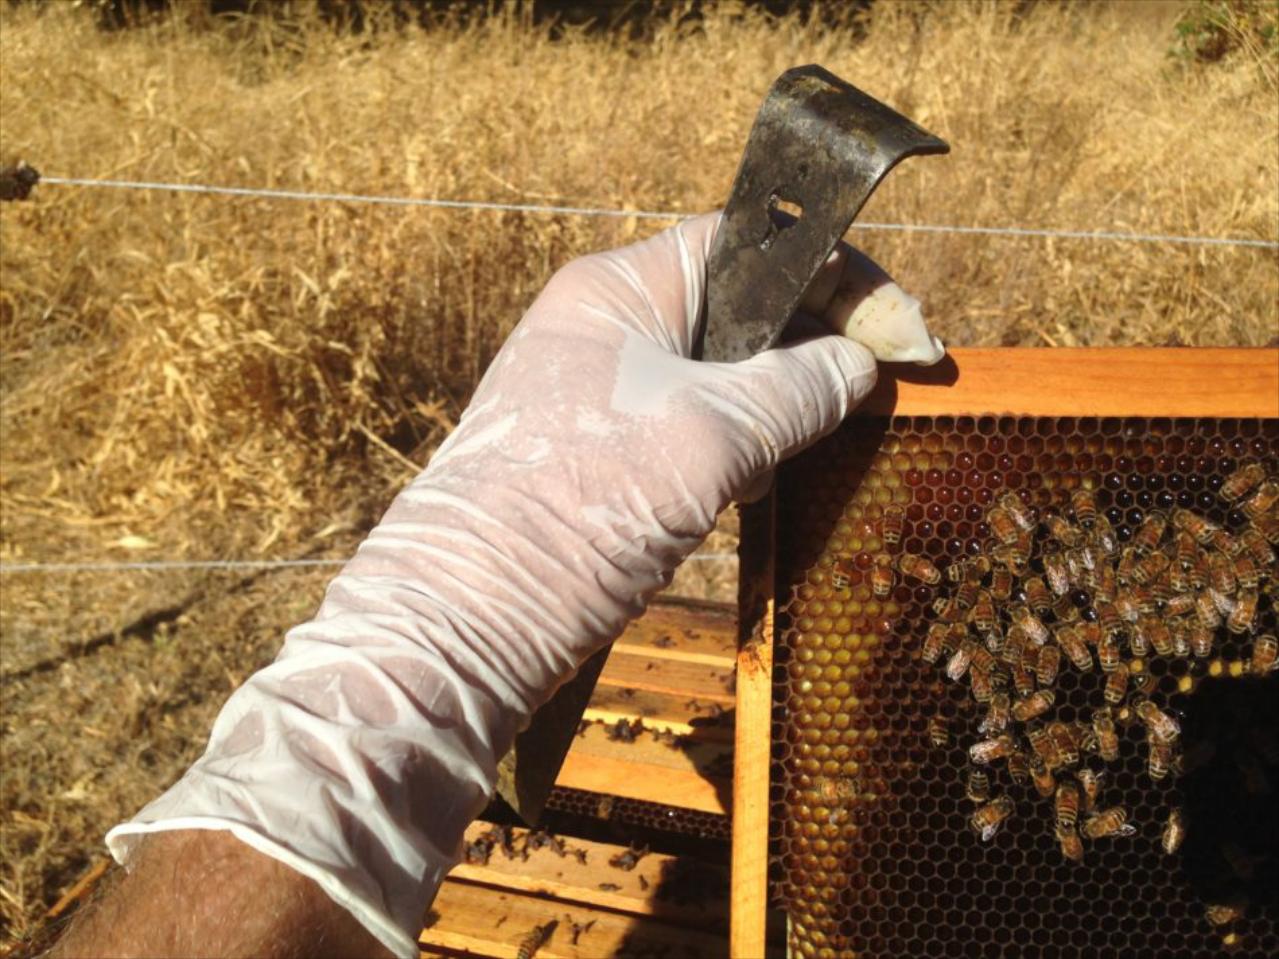
Never reach for a frame if there are bees looking at you. Notice the bees in the photo that are looking at you. They are guard bees, and since they’re looking at you, they are aware of you. Give them a gentle puff of smoke to turn them away from you. Only when you don’t see any faces looking at you should you reach towards a frame. Keep an eye on the bees, and when they start to look at you again, give another gentle puff of smoke.
Make sure that your smoke comes out cool, WHITE, and DENSE. Bees do not respond to weak or grey smoke like they do to dense white smoke. Many beekeepers use burlap, but I dislike the smell. Many natural materials work well–ask a local beekeeper. My favorites are pine needles fluffed by car tires on an asphalt road after the first autumn rainstorm, punky oak wood, eucalyptus bark, oak leaves, or wood pellets (harder to light, but burn for a long time).
(Thanks to beekeeper Trish Harness for this suggestion)
Approach bees with respect, but get over your fear of them as quickly as possible. Stings are the bees’ way of telling you that you have made them think that they need to defend their colony–once you learn not to give them reason, you can make it look like magic.
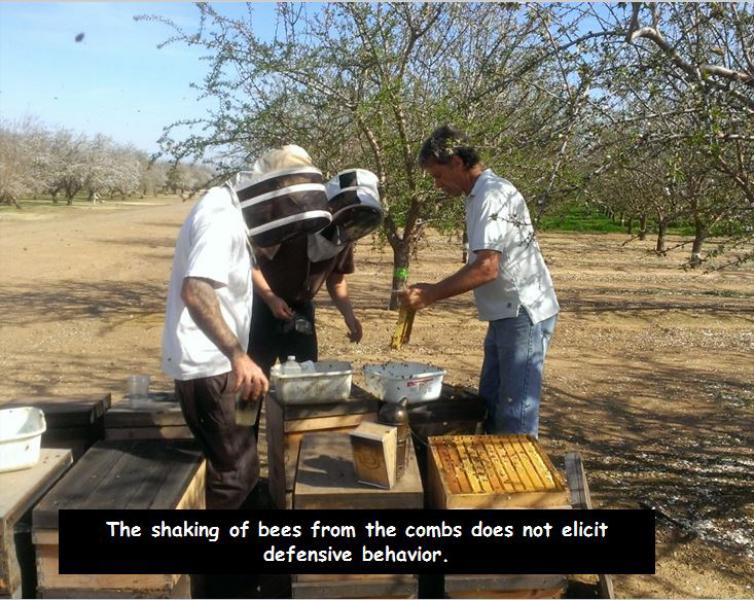
In my beginners demonstrations, I get people over their initial fear by my example of wearing only shorts and a tee shirt, opening a hive,, and then shaking a tub full of bees from the comb, then ladling scoops of bees with my bare hand into their bare hands–no one ever gets stung. After this demonstration, everyone is far more relaxed around the bees. But I know exactly what I’m doing.
And I’ve been stung so many times that I no longer swell up or itch after a sting (OK, slight temporary swelling when stung on the lip or eyelid). One gets used to stings to the hands and elsewhere, but the ones to the face still hurt like hell for a few minutes. So although you will see many experienced beekeepers working without veils (because it’s so much easier to see the queen, eggs, etc.), I strongly suggest that beginners always wear a veil until they no longer swell in response to stings. And make sure that any visitors wear a veil. Practical tip: put on your veil before you enter the apiary, and don’t remove it until you are out of sight of the hives (this is when many get stung to the face). We really like the hooded jackets that unzip from the front (I don’t like to promote particular brands, but we like the Eco-keeper hooded jackets).
Typical bee working for my sons and I is shown in the photo (we’re in an almond orchard, performing alcohol washes for varroa). Note that when it’s warm, my sons typically throw a hooded veil over their heads, unzipped from the jacket.
Move smoothly–like you’re doing Tai Chi. Bees only sting when they feel that you are threatening their hive. So don’t do anything threatening! Fast or jerky movements appear threatening. Always use smoke, but use it sparingly. The only bees that will generally sting are the guard bees on the periphery of the cluster–especially at the entrance and at the top bars. Bees that are not looking at you aren’t interested in you. If you see bees looking at you, give them a little puff of smoke and wait until they turn away from you. It is only safe to pick up a frame if there are no bees looking at you.
Bees will often fly at your hands or face and give “warning bumps” prior to actual stinging. Pay attention to what they are telling you–BACK OFF! They either don’t want to be disturbed at that moment, or you have not used enough smoke, or you’ve been too rough.
If there are bees looking at you, warning bumps, stinging, or the smell of alarm pheromone, STOP WHAT YOU ARE DOING! Do not keep going, or things will quickly get worse–you don’t want to go there! Give the bees a chance to calm down, and for alarm pheromone to dissipate. Give the top bars a light puff or two of smoke until there are no bees facing you. If you can’t get them to calm down, then just close the hive up for the day.
The best way to learn how to work gently with bees is to carefully watch an experienced beekeeper who doesn’t usually wear gloves (or veil). Such a beekeeper has learned how to work bees with care and respect. Those who always wear gloves and full gear often have very bad habits. I strongly suggest that you learn to work bees barehanded in good weather–thin latex or nitrile gloves are a good way to eliminate most stings, but still get a “feel” for the bees.
The Rules
Q: What “should I do?”
A: There are no “shoulds” in beekeeping other than practicing good animal husbandry. Bees need only a dry cavity, food (nectar, pollen, or syrup and pollen supplement if lacking from natural sources), and parasite management. My basic rule is to not do anything unless you completely understand the reason that you are doing it!
You will find on the internet a plethora of opinions (often strongly expressed) on the “right way” to keep bees. In general, the more emphatic the author, the less I’d trust the information. For a review of the rules according to the bees, see The Rules and The Rules Redux.
Randy's Recipe for Healthy Hives
- Run locally adapted bee stock.
- Use young, vigourous queens (1.5 season max).
- Monitor and control varroa all season long!
- Provide good nutrition (pollen sub if indicated).
- Minimize exposure to insecticides and miticides.
- Be proactive rather than reactive!
Getting Started
I strongly suggest that you start with two deep Langstroth brood chambers, and later “medium” honey supers over a queen excluder (lots of reasons). Such equipment has truly stood the test of time (since the mid 1800’s) and is by far the easiest way to learn to keep bees. You can try other systems (top bar, Warre, etc.) later, after you’ve experienced success with “standard” equipment. If weight (of the boxes) is an issue for you, I suggest using 8-frame Langstroth equipment (same as above, but a narrower, lighter box).
Location
Place your hives in a sunny location with morning sun, so that they can get an early start at foraging in the morning. If you live in an especially hot area, they will benefit from afternoon shade. Hives will do OK in the shade, but are much more “pissy” to work. Place the hives in a dry area with good air drainage. The best hive stands are two 8″x8″x16″ cinder blocks, placed flat sides down, with the hive tipped slightly forward for drainage. Do not place more than one hive on a stand, as vibrations from working will transmit via the stand to the other hives. If you have neighbors, place a fish pond with aquatic plants and floating wood as a water source for your bees (so that the bees won’t cause problems with your neighbors).
If you live where there are bears, you’ll need to protect your hives from them. Bears are surprisingly strong, but can be deterred by a well-constructed electric fence.
Installing the bees
Congratulations, you’ve just purchased either a quality nucleus colony (“nuc”) or a shook swarm (“package bees”) with a newly-mated queen from selected stock!
Warning: A strong nuc is full of brood and ready to grow explosively! You may need to transfer your nuc into a larger hive within a day or so, or they may swarm. And unless they have at least half a frame of honey stored, they may starve if not given some sugar syrup.
Some nucs (and all packages) have the queen caged. If so, remove the candy cap when you get home to allow the bees to chew through the candy and release the queen. But do NOT remove the candy cap if the bees are tightly balled over the cage, indicating that they have not yet accepted the queen–wait another day until they are walking lightly over the cage.
Install the nuc in the center of a brood box with additional frames to fill the box. Keep the frames of the nuc in their original order. Be very careful not to crush the queen–a substantial percentage of queens are accidentally killed by new beekeepers during the initial transfer process.
For a package, there are a zillion recommendations for specifics as to how to install the bees. It makes little difference if you are installing only a single package if there are no other hives immediately nearby (if there are, install late near dusk to avoid drift of bees to the established hive). In general, lift out the feeder can to remove the queen cage, and hang the cage (use a grocery store twist tie or toothpick) from the top of a center frame. Then shake the bees out of the cage into the hive (you can temporarily remove frames). Use no smoke during the installation. Then replace the hive cover (you can place the package with the hole next to the entrance to allow the rest of the bees to find their way into the hive.
Feeding your bees
Your nuc may arrive hungry–check to make sure that at least one of the outer combs contains stored honey. If there is a good nectar flow on when your nuc is installed, there is no need to feed, but the feeding of sugar syrup to the small colony frees the bees from the need to forage for nectar, and they can use their efforts instead to collect pollen, rear brood, produce beeswax, and draw out comb. The production of beeswax in order to “draw out” the frames of foundation into “drawn combs” requires a great deal of sugar (whether from nectar or syrup). Therefore, it is generally a good idea to consistently feed sugar syrup to the new colony until all the frames in the lower box are fully drawn.
A growing colony needing to draw foundation can utilize more sugar syrup than you can imagine (gallons)–feed it as much as it will consume until all 10 frames in the lower brood chamber are drawn out.
Here’s the art: the bees can only build comb on warmed frames, so unless the weather is quite warm, they won’t be able to draw comb outside of the cluster. If you overfeed, the bees will fill the broodnest full of nectar, thus preventing the queen from laying more eggs. So what you want to do is to observe the broodnest, and feed enough syrup for the bees to be creating “white wax” at the edges of the cluster (meaning that the amount of incoming nectar and syrup, relative to the amount of free open cells, is stimulating them to activate their wax glands). Once the sealed brood of the nuc starts emerging, the colony (cluster size) will start expanding rapidly, and you can then feed heavily to allow them to draw comb.
So at first, the colony may need perhaps a cup of syrup per day. Later on, it may take a gallon a day. Once all the frames in the first brood chamber are drawn, then it is up to you whether you wish to continue to feed. Typically, in the Sierra, the main honey flow may be on by that time, and you may wish to collect some honey. You can always return to feeding later in the season (July), if necessary, to help them to draw out all the combs in the upper brood chamber, and to put on honey stores (in Sept and Oct) for winter.
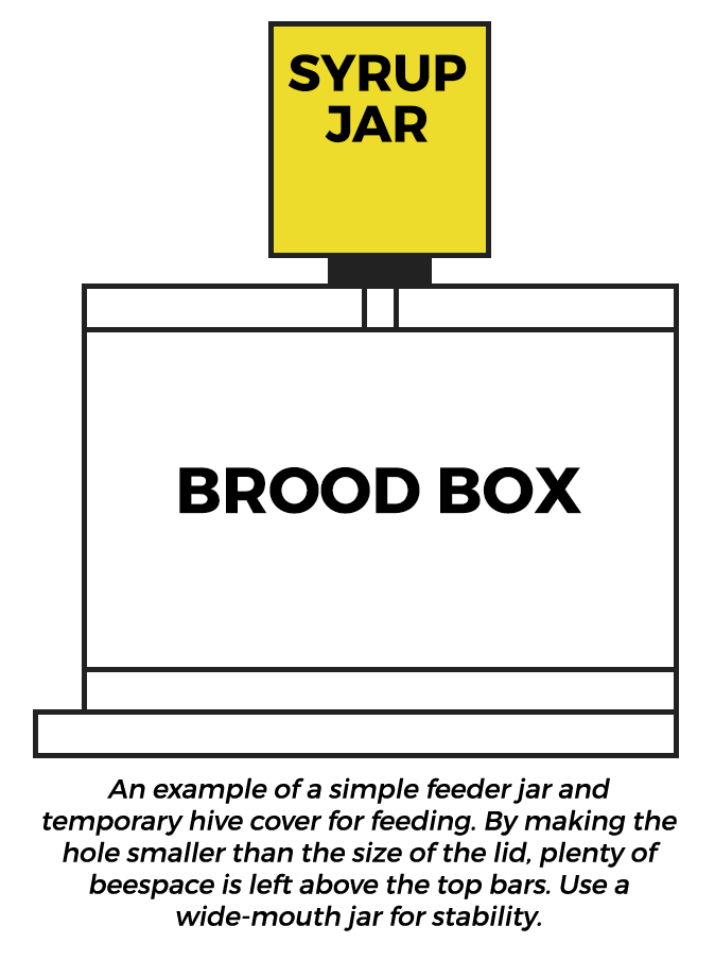
I recommend making a dedicated feeder lid—make it from a 16¼” x 20” piece of plywood, with an approx. 1½” hole in the center. Use this lid temporarily in place of your regular lid(s). Make a feeder bottle from any wide-mouthed quart jar, with about three small holes punched closely together in the center of the lid. To use the feeder, fill the jar 2/3rds full of white granulated sugar (feed no other sugars*), then add hot tap water until nearly full. Place your finger over the holes, and shake ‘til the sugar’s dissolved. Invert the jar, centered over the hole in the feeder lid. Generally, feed as much syrup as the bees will take (at least a quart per day, often more).
*Nectar contains sucrose, fructose, and glucose–all of which bees can easily digest and utilize. Bees cannot digest some of the complex sugars or minerals in raw or brown sugar, some fruit sugars, and food waste sugars–feeding any of these may cause yeast infections in the bee hindgut and dysentery. Old honey may contain toxic HMF or AFB spores, so is not recommended. Each type of sugar syrup has advantages and disadvantages as far as granulation issues, etc. It’s generally easiest for the hobbyist to feed sucrose syrup, using plain old “white” granulated cane or beet sugar (ignore the internet chatter about purported GMO issues).
Use “light” syrup for stimulation, “heavy” syrup for winter stores. Light syrup is 1 part sugar: 1 part water (by either weight or volume)–this is similar to the most sugar-rich natural nectars; heavy syrup is 2 parts sugar:1 part very hot water, and is quickly converted by the bees to “honey” for winter consumption. Bees also do very well on a commercial sucrose:HFCS mix, such as Mann Lake’s Prosweet, commonly used by professional beekeepers (other manufacturers carry different sugar products at different branches, so I can’t make blanket recommendations).
C&H Baker’s Drivert (a dry flaky product from bakeries) makes for a great dry feed for stimulation–useful in nucs. Baker’s fondant, hard “candy boards,” or even granulated sugar over newspaper can be used for winter feed (although simply leaving the bees enough natural honey is usually best, unless they have stored honeydew, which can cause dysentery).
I’ve seen no evidence of benefit from adding acid, essential oils, or purported stimulants or health supplements to the syrup. I do add a half tsp of unscented household bleach per gallon to light syrup fed during hot weather, in order to prevent harmful microbial growth in the feeders. The bees appear to love chlorine!
It may never be necessary to feed sugar to your colonies–I kept bees for 25 years without ever feeding syrup. But then I learned that syrup can be of great help to the bees when there is no nectar flow, and can greatly assist colonies in “getting going” and drawing comb.
No matter what you feed, be sure to keep your honey pure by never feeding syrup in any way that it could possibly get into honey to be extracted!
Hive Inspection
For best queen survival, you should not disturb the new colony for a few days (other than feeding). Inspect the colony after a week. Use little smoke and minimal disturbance. If all’s well, the bees should have started drawing out fresh comb, there should be brood of all ages, including white larvae and eggs. Note that eggs are very difficult for the beginner to see, especially against new comb. The presence of any eggs, or young larvae in royal jelly, means that you have a queen, and all’s well—you need not actually see the queen!
Q: How often “should” I inspect my colony?
A: There are no “shoulds” in beekeeping. You are learning about beekeeping. You can learn some things from books, but there is nothing like the hands-on experience that you get from closely observing what is going on inside the box. So open your hive as often as you can (every other day is OK) so long as you use only enough smoke to keep the bees from looking at you, and handle the frames carefully and gently. Sure, such frequent opening is disruptive to the bees and may result in some degree of queen losses, but it is the only way you will ever become a good beekeeper. It is far easier to observe the growth of a small nucleus colony than it is to tear into a hive when it is huge. So get in there and watch your colony grow! Learn to recognize the ages of the brood, fresh eggs, the expansion of the broodnest, pollen stores, comb building, etc. It is not necessary to ever actually see the queen, so long as you see eggs or young brood.
Colony Buildup
The primary requirement for colonies to grow is plenty of nutritious pollen (some pollens are more nutritious than others). Colonies grow only when pollen (and generally at least some nectar) is coming in. For my local area in the Sierra Foothills, pollen income and colony growth are as below:
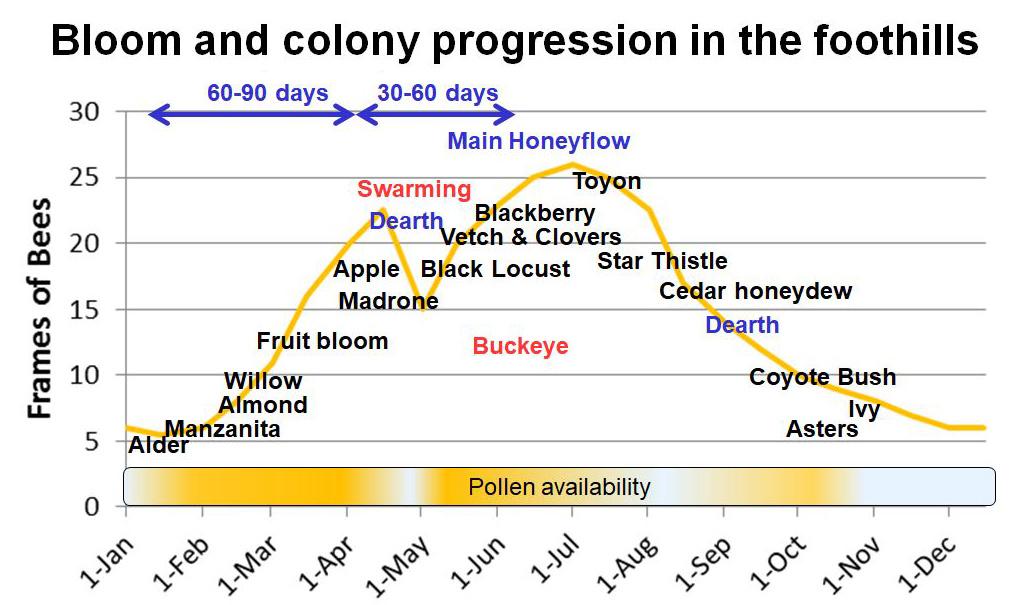
Note the typical amounts of time required for an overwintered colony to build up to swarming, and then to its maximum population. And note how buildup follows pollen availability.
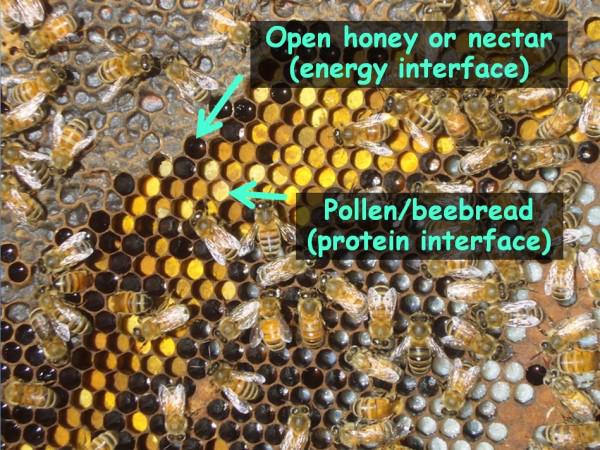
Reading the Combs
There is little need to ask others for advice–if you learn to read the bees and the combs, the colony will tell you its exact condition, and whatever it needs. I’ve labeled the components below.
You always want to see a nice band of beebread around the brood. Should this band disappear, suspect that the colony is suffering from nutritional stress (more later). There is no benefit from feeding pollen sub patties to colonies if they are already gathering plenty of natural pollen (in the Foothills, typically from February through the end of June, unless there is prolonged poor weather).
I have written a lengthy “Understanding Colony Buildup and Decline” series–all posted to ScientificBeekeeping.com. Reading this series from beginning to end will give you a deep understanding of the biology of this fascinating creature, and allow you to make better management decisions on your own.
Initial Varroa Management
Unless I tell you otherwise, any nuc that I sell has already been treated to reduce varroa levels (we use a dribble of oxalic acid syrup during a critical window of time; see Oxalic Treatment of Nucs). For packages, I suggest that you give any package a similar oxalic dribble treatment prior to Day 8 after installation (at which time varroa can begin to “hide” in the sealed brood). If the nuc has not been treated, I suggest the application of either a Hopguard II strip (considered an “organic” treatment, but less effective), or an Apivar strip (synthetic, but highly effective, since our mites have not previously been exposed to amitraz).
Helping the Colony to Grow
As the population grows, and the colony can cover more frames, the bees will draw combs of foundation from the center out, and the queen will start laying in those combs. This is your chance to watch a colony grow! (The population of bees in a nuc will expand quickly; that of a package, not until 3 weeks after installation).
Growth of your colony will be dependent upon the local nectar and pollen flows.
The colony can’t raise more bees without pollen–pollen is the main limiting factor for colony growth and well being. Colonies also need energy-rich nectar to heat and fly, and for producing beeswax.
In general, pollen flows are adequate in most areas in spring, but if rainy weather confines the foragers, the nuc will benefit from being given a pollen sub patty or two (no benefit if there is natural pollen coming in). And unless there is a very heavy natural nectar flow, the colony will greatly benefit from being fed all the 1:1 sugar syrup that they will consume (a half gallon a day if they will take it). Feed syrup until you see white wax being produced–they will not draw comb unless they are producing white wax!
Making sugar syrup: use only white granulated sugar (cane or beet). Sugars with any color may contain undigestible carbohydrates or minerals that may cause gut dysbiosis. Feed “light syrup” for buildup (one part sugar to one part water, by weight or volume); feed “heavy syrup” for putting on winter stores in fall (2 parts sugar to 1 part boiling water).
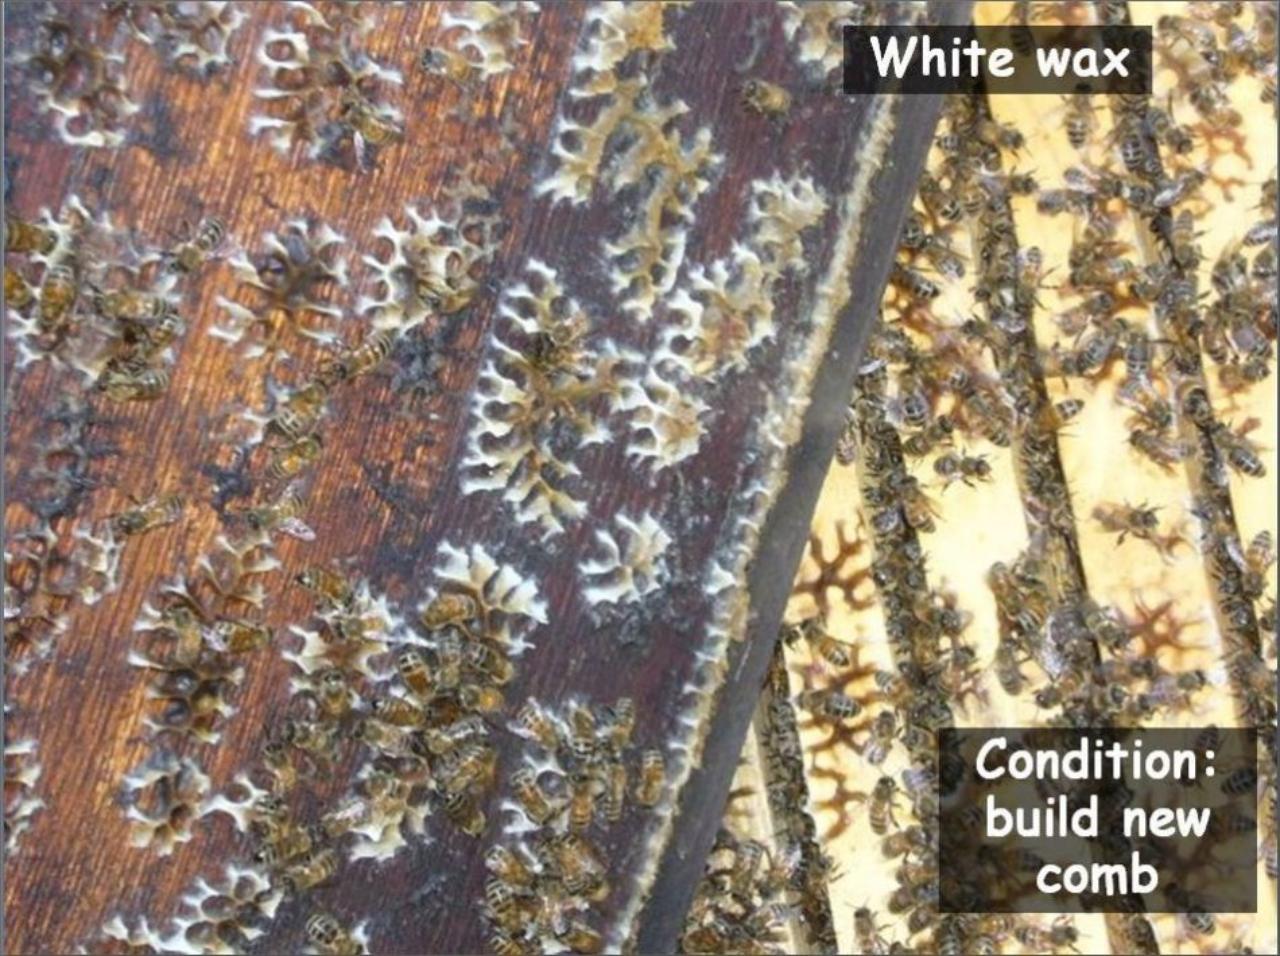
Learn to recognize “white wax.” It is only when bees are producing white wax that they will build comb and draw foundation. It is a sign to the beekeeper that the bees have filled every available cell with nectar, and are crying for more room. Thus, it is an indicator of a strong nectar flow, and a signal to add honey supers immediately.
Frequency of Inspection and arrangement of combs
In general, place the combs back into the same arrangement that the bees had. Always keep brood (and frames of eggs) together, honey to the outside, and pollen at the edge of the brood nest.
Exception: It’s hard for the bees to draw out the outermost combs of foundation. Once the bees draw out the inner side of the second combs in, reverse those combs, and move them to the outside (only if they contain no eggs–see illustration).
Once the combs have been drawn and filled, their positions can in general be exchanged, just be sure to keep brood combs together, and in the middle of the hive.
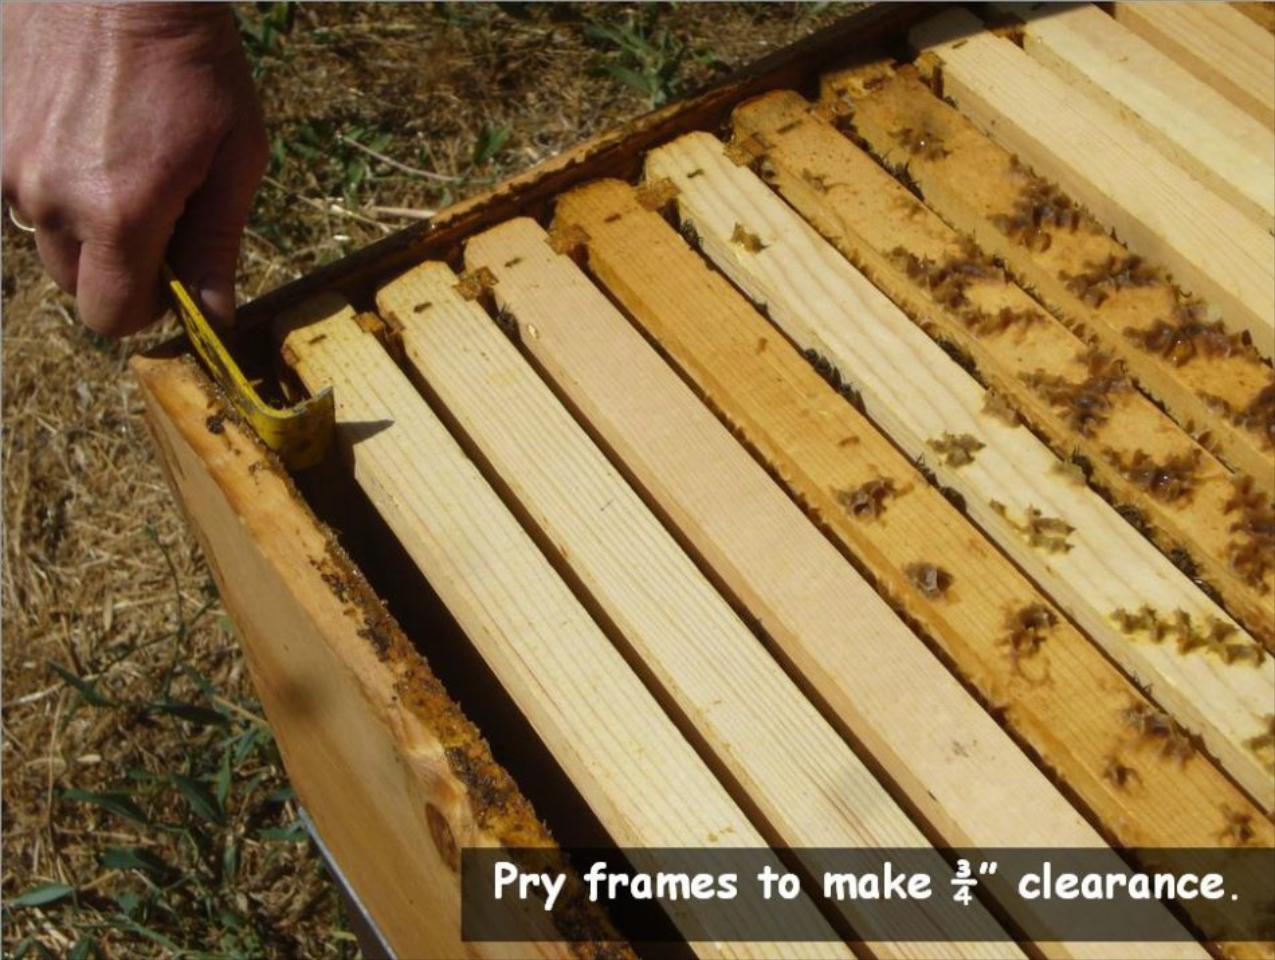
Handling tip: always run 10 frames in your brood chambers, squeezing them back tightly together after each inspection, and then centering them in the box.
Prevent propolis from building up between the end bars–this will maintain proper bee space between the combs. Always squeeze center the frames tightly together, and then center them in the box–you can pry them all sideways to leave 3/8″ inch clearance between the end bars of the outer combs and the sides of the box. If you always do this, you will generally get straight combs, and will always have working room between the combs.
Feed the colony sugar syrup continuously, but not to the extent that the queen is unable to expand the brood nest due to excess stored syrup and nectar. If the bees store syrup in the center of the brood area, cut back on feeding.
Note that there is often a large colony-to-colony variation in buildup and honey production. Unless you have other colonies to compare to, it’s difficult to know how well your colony is doing, compared to the “norm.”
Make sure you have a queen—indicated by eggs and brood of all ages. Note that it is common for beginners to inadvertently kill the queen by inexpert handling of the frames!
Queen Issues
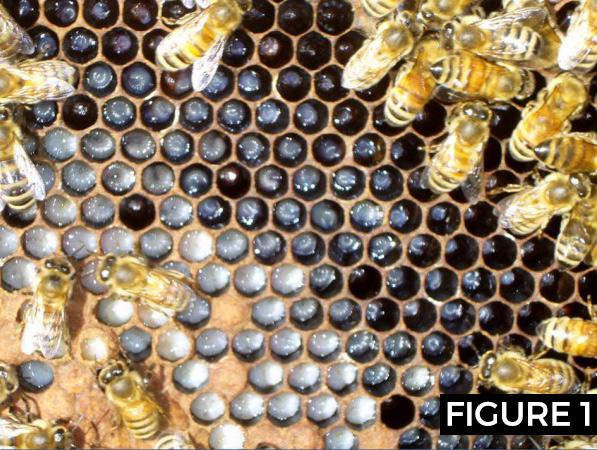
Check to see that the queen is laying a regular pattern of brood in concentric rings by age. If brood pattern is spotty or uneven, the queen may have a problem, or the colony may be suffering from a brood disease.
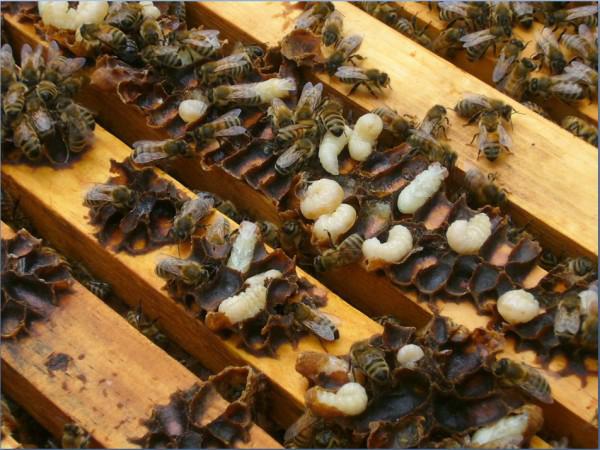
Figure 1 shows a colony with well-fed, healthy brood. Note the even stepwise progression of larval ages,their high rate of survival, and the copious jelly being fed to the young larvae–all signs of a good queen in a colony in good health, enjoying good forage conditions.
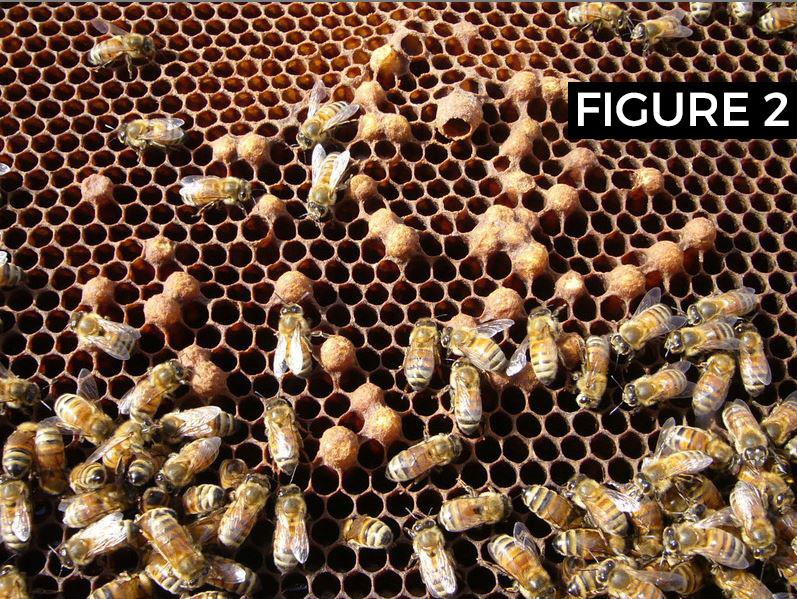
It’s well known that in humans, the females improve with age. Not so with honey bee queens. Once a queen has mated, her supply of stored spermatozoa is finite, and typically begins to run short after two seasons of broodrearing in a large colony (she’ll last longer where seasons are short, or in a small colony). This depletion typically occurs in the late summer of their second season. At this point, some of the eggs that she lays in worker cells may not get fertilized, and the queen becomes a “drone layer” (Figure 2). In nature, the bees typically replace their queen when this occurs via a process called supersedure.
Figure 2 signs of a failing queen. Unfertilized eggs laid in worker cells (resulting in scattered drone brood), and a supersedure queen cup near the top of the photo. Time to replace the queen!
Queen Cells
If there are queen cells being formed, the colony may have lost their queen (you’ll see several small, scattered emergency queen cells), may be superseding the queen (one or two very large queen cells on the side of a frame; allow the process to continue), or be preparing to swarm (large queen cells often at the bottom of the frames–colony needs more room).
If you see emergency queen cells with a larva and jelly inside, you have likely lost the queen–either requeen or allow the colony 25 days to requeen itself. Smaller “queen cups” without eggs or jelly inside or normal.
Swarm Cells
Requeening
There are a few ways to requeen your colony. You can allow the bees to do it themselves via supersedure, but this is risky in the foothills due to the limited supply of drones in late summer, perhaps resulting in a poorly-mated new queen going into winter.
You can rear your own daughters from your favorite queen by simply creating a few nucs in springtime, and allowing each to rear emergency queen cells. It will take a minimum of 24 days before the new queen begins laying eggs.
You can speed up the process by purchasing or grafting queen cells.
Despite claims, attempts to requeen a queenright colony by placing a queen cell into it are generally unsuccessful–you need to remove the old queen first. I generally prefer to introduce my queen cells into nucs for mating out, and then after seeing the new queen’s brood pattern, then introduce the nuc into a colony that has sat for a day after removing its queen. Gently place the nuc into a full-sized brood chamber, remove the cover from the colony to be requeened (no queen excluder), lay a strip of newspaper at least as wide as the nuc lengthwise over the top bars (this prevents the new queen from running downhill into foreign bees), and place the cover over the top. After a few days, you can rearrange the combs.
If instead you purchase a caged queen, if she’s been banked, she may need to be fed by the bees for a day to get her into laying condition and to pick up the colony odor for better acceptance. A good way to ensure that your caged queen will be accepted is to do a two-step process:
- First, queen acceptance is best when there is a nectar flow on and no robbing–it may help to feed the colony syrup. Also, queens are more readily accepted by young bees with brood–if your colony has been queenless for some time, it may help to add a frame of young brood with the adhering nurse bees. And in any case, you’ll generally get best acceptance into a newly-made nuc that has sat queenless for a day or two.
- Press the queen in her cage, in the brood area, with the screen of the cage fully exposed to the bees, into the comb (avoid comb with honey, as you can drown the queen). Keep the candy covered with the cork or cap, or vinyl tape. Wait 24 hours. After 24 hours gently open the hive with minimal smoke and inspect the behavior of the bees on the cage. If they are walking lightly over the screen as below, and you can see them offering the queen food, and the bees can be moved with a gentle touch of your finger, they’ve accepted the queen. You can then expose the candy, replace the cage, and allow the bees to chew through the candy to release her after you’ve put the hive back together.
Another method that works well is to make a “press in cage” of 1/8″ hardware cloth (washed to remove any oil). Place the cage over some emerging brood, tip it up and carefully release the caged queen into the screen cage, and gently press the screen fairly deep into the comb. Then open the hive after a couple of days and if all looks well, gently release the queen–watching to make sure that the bees don’t attack her.
A tip: new beekeepers often manage to allow a caged queen to fly off. If you do so, freeze, and she will often return to the cage in a few minutes. Prevent this from occurring by handling caged queens in a closed room, your car, or in your removed veil.
Problems and Diseases
Note, combs and boxes from diseased or “deadout” hives can be reused without sterilization, except for AFB.
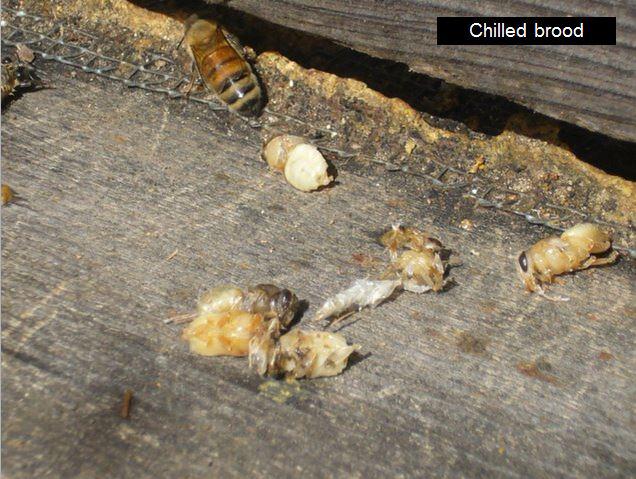
An unexpected cold night in the spring can result in some chilling of the brood at the periphery of the cluster. You may see pulled out pupae on the landing board the next morning. You do not need to take any action.
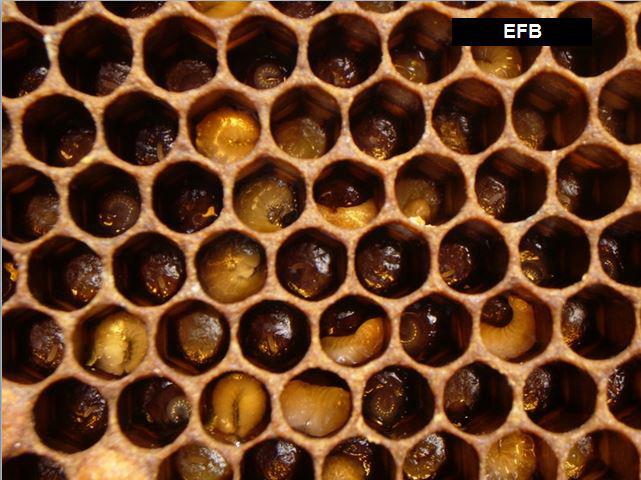
If the brood is “spotty,” look for signs of brood disease—chalkbrood (white & tan “mummies”), EFB (twisted white & yellow larvae–often hard to diagnose), or AFB (sunken perforated cappings, melted brown larvae that “rope”).
EFB
EFB is a common bacterial disease, especially in stressed colonies in the spring.
European Foulbrood (EFB) shown in picture. EFB used to just “go away” on its own; our current strain doesn’t. Treat with oxytetracycline — a natural antibiotic. Oxytet now requires a veterinary prescription, but any professional beekeeper will likely have some on hand.
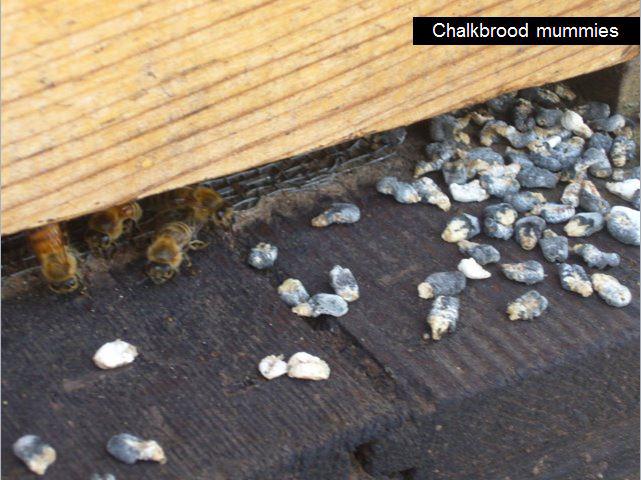
Chalkbrood
Another brood disease is Chalkbrood (a fungal disease):
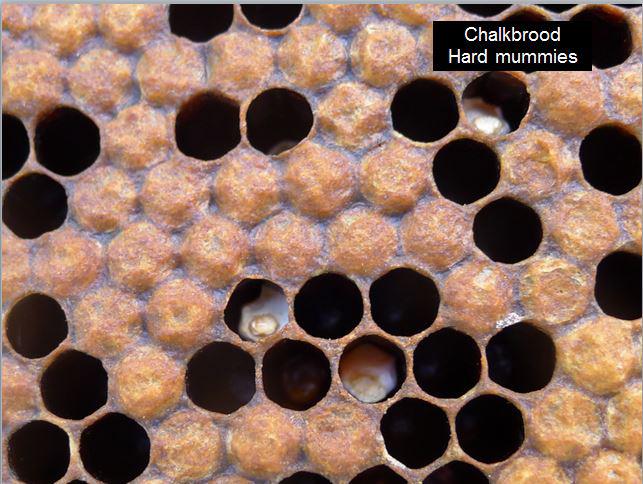
Chalkbrood produces distinctive, two-toned hard “mummies” in the combs.
There is no treatment for chalkbrood. If it doesn’t spontaneously disappear, the best advice is to requeen the hive.
AFB
The most serious disease (other than varroa-induced virus collapse) is American Foulbrood (AFB)–a highly contagious bacterium that can spread to your neighbors’ hives. Although AFB is now uncommon in professional apiaries, it is currently resurging in some urban areas that have a lot of hobby beekeepers who don’t recognize this serious problem.
AFB is nothing to mess with–ask for help if you suspect that you see it, and then scrupulously eliminate it before it spread to your neighbors!
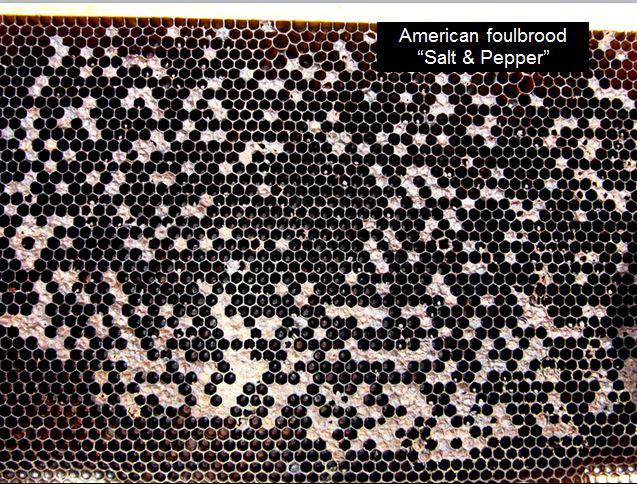
AFB produces a distinctive, “salt and pepper” brood pattern, with some cells having sunken, perforated cappings. It generally has a strong distinctive unpleasant odor (a cross between gym socks and dead rotting bees).
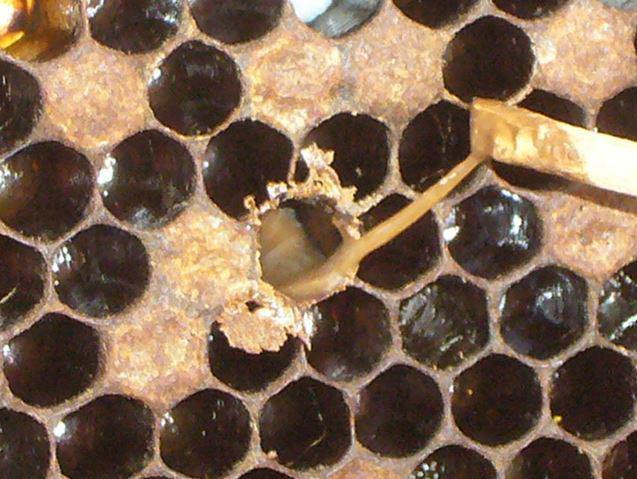
The caramel-colored melted pupae shown are distinctive for AFB. Stir a dry stick into the melted brood cell and then slowly withdraw it. If the slime ropes out for 3/4″, that is diagnostic of AFB. We burn colonies if we see even one cell! Do not ignore AFB!!
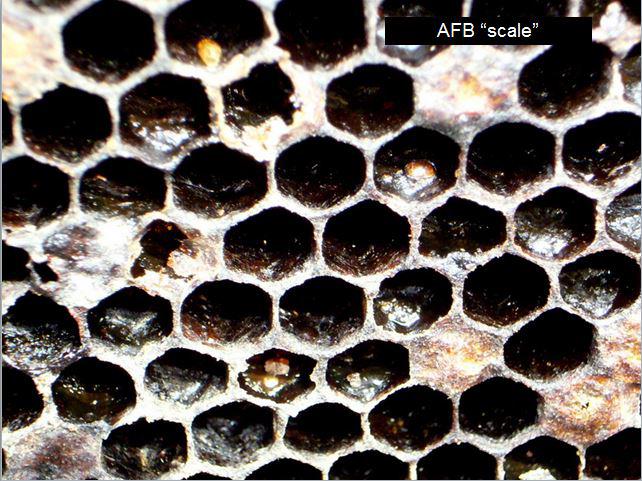
Colonies that have died from AFB will have black “scales” tightly adhered to the bottom of the brood cells. If buying or reusing combs, check them carefully for AFB scales, as this is a common way to spread the disease.
AFB combs must be burned or safely disposed of in a landfill. The boxes can be sterilized and reused.
The Clean Up Crew
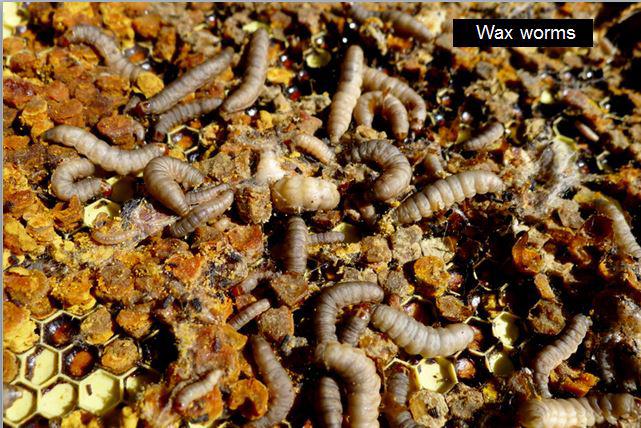
Once a colony weakens or dies, if the weather is warm, the Wax Moth will move in and lay eggs. Its caterpillars will rapidly consume any pollen stores, boring through the combs, and building silken tubes and webbing, and chewing into the wood to pupate. You can remove the silk (especially the white cocoons), and reuse the frames with no additional cleaning.
Wax moth is generally only a problem when temperatures are above about 70°F. Store boxes of dark combs with light and air exposure (never wrapped up or stacked) to avoid wax moth damage. BTW, wax worms make great pet food, and are tasty to eat, raw or cooked.
OK, most of you won’t have any of the problems above, and your nuc or package will rapidly outgrow their first brood chamber.
Adding the Second Brood Chamber
Once the bees of your colony cover all 10 combs in the first brood chamber, it’s time to add a second brood chamber of foundation above it. At this point of time, you should assess the varroa infestation level in your colony. I’ll return to adding your second brood chamber after I discuss varroa management.
Varroa is the Leading Cause of Colony Morbidity and Mortality
The leading cause of colony failure for beginners is from not managing varroa mite levels, which then allows viruses and nosema to kill the colony.
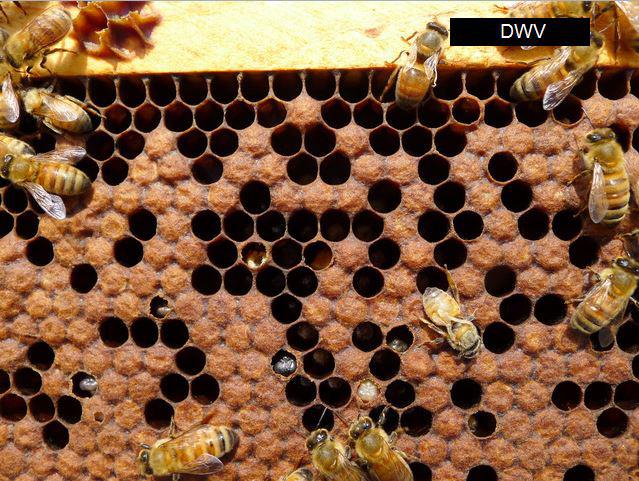
The varroa mite transmits viruses (mainly Deformed Wing Virus) within the hive, resulting in dying brood. This is called Parasitic Mite Syndrome (PMS). Once a colony reaches this stage (see photo), it is difficult to save.
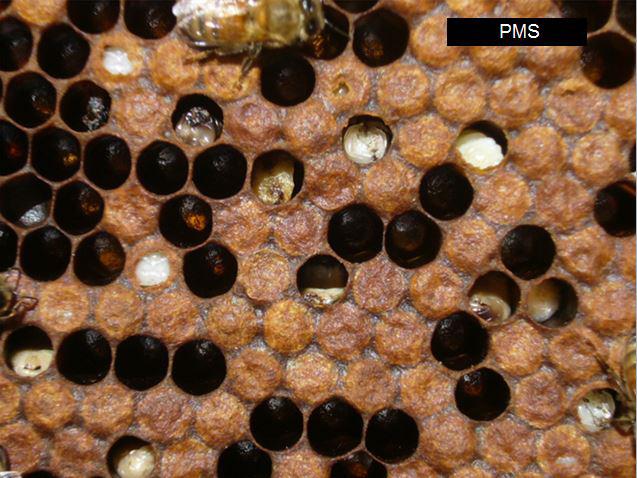
Note the two bees with deformed wings in the photo labeled DMV–they are suffering from varroa-transmitted DWV. Also note the dying brood, and bees unable to emerge.
If your colony was strong in summer, and then the bees suddenly disappear in fall, leaving behind plenty of honey above, and scattered sealed brood in the lower box, varroa is generally the culprit. You can diagnose by holding a brood frame horizontal with the top bar away from you. With the sun coming over your shoulder to illuminate the “ceilings” of the cells, look for the telltale white guanine deposits left by mites. If you see them, it was most likely varroa that did your colony in.
Below are some photos of typical varroa deadouts:
In this photo I have the top bar toward me (sun to my back), looking at the “floors” of the cells for AFB scale. To look for guanine deposits from varroa, turn the top bar away from you.
Tip: when inspecting combs, look for the shadow of your head on the ground, and then face it. This will put the sun directly behind your back (without blinding yourself by looking directly at the sun).
“Treatment Free” Beekeeping
Although my goal is to develop a stock of bees that require no treatment for varroa, I adamantly do not recommend “treatment-free” beekeeping for beginners. Control varroa, or colonies will generally die an ugly and unnecessary death from the varroa/virus complex. Not only that, but when that colony crashes, it floods the surrounding colonies with varroa mites, making you a nuisance to both surrounding beekeepers, and the feral population of bees that is slowly evolving resistance to the mite. PLEASE MANAGE MITE LEVELS IN YOUR HIVES AND DO NOT ALLOW COLONIES TO COLLAPSE FROM VARROA.
Once you’ve mastered keeping colonies alive and healthy for at least three years, then you can experiment with going without mite treatments (don’t expect most commercial bee stocks to survive without treatment–you will likely have better luck with VSH, Russian, or feral survivors). There are several easy-to-use and effective “natural” mite treatments on the market that will not contaminate your combs or honey, as well as biotechnical methods such as drone brood trapping and queen caging.
Monitoring Varroa Infestation Levels
Every bee colony contains varroa mites, and more drift in from other hives. And although we breed for resistant stock, the vast majority of our hives require mite treatments to survive. Mite buildup follows a predictable growth curve. My mite model demonstrates the expected mite population and alcohol wash counts for a nuc, treated before purchase:
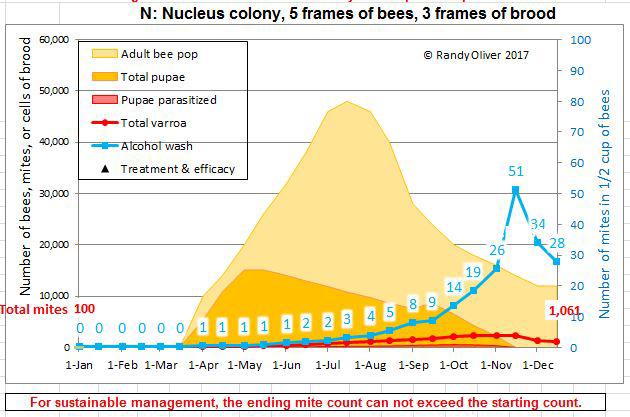
In the above chart, the nuc started with a reasonable 100 mites in April. Note the progression of alcohol wash counts. This nuc had a chance to survive the winter, but would start the next season with far too many mites to survive a second year. Note: the alcohol wash mite counts rise substantially more slowly than the actual mite population–realize that the mite wash count will rise rapidly in late summer as the colony bee population begins to decline. You want to be proactive rather than reactive with mite management–intervene in early July if mite counts exceed 4 mites!
Compare to the chart below, with a somewhat higher starting mite count:
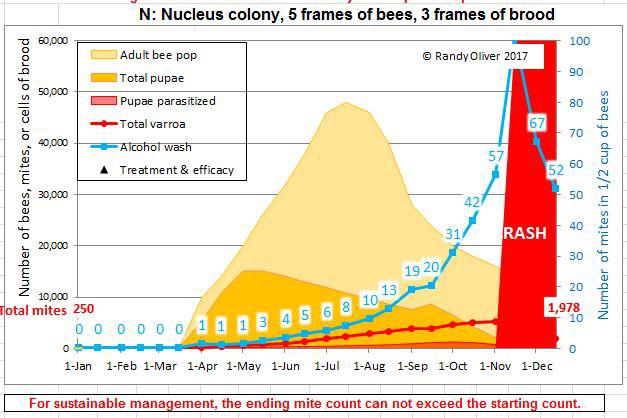
In the above chart, I started with 250 mites in April. Note that the starting alcohol was count was still low, but the colony crashed in November. Had the hive been in an area where there were other high-mite hives, it would have crashed even earlier, due to mite immigration from your neighbors.
Here in the California foothills, with 11 months of broodrearing, most colonies will require two 95% reductions in their mite levels during the season. In our operation, we knock back the mites at least 4 times, in order to keep our colonies healthy and productive.
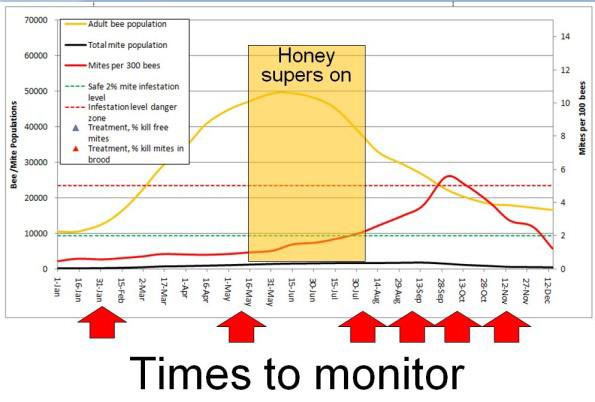
Starting in July after installing a new nuc or package, you should test it for mite level, using a sticky board or other method (I strongly recommend the “alcohol wash” or “sugar shake”). Assume that all nucs have varroa mite. You must monitor mite level, and treat if the mite level exceeds the seasonal “treatment threshold” (3 mites/half cup of bees prior to July 1, 6 mites from July 1 through late fall). We are having great success with mite-tolerant queens, biotechnical methods, and “natural” treatments.
I recommend mite testing in early spring, before supering, again in early August, and in late September (Northern Calif).
Due to the huge variability of stickyboard counts, any single stickyboard count is nearly meaningless. However, they can be of use if done regularly.
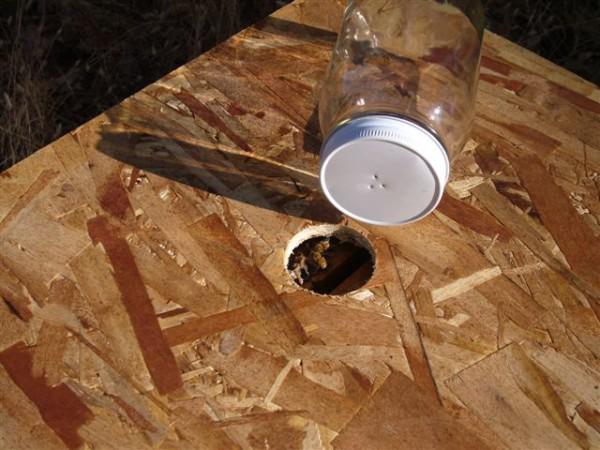
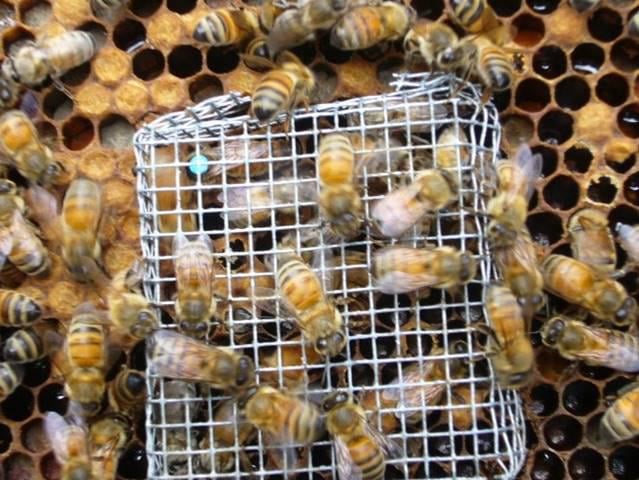
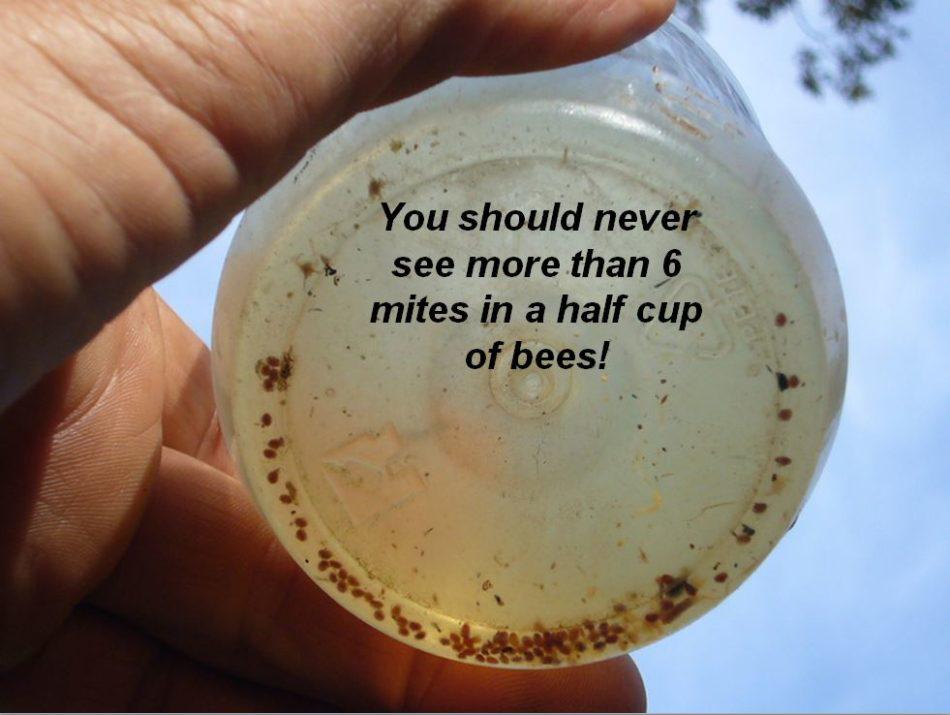
The best test is an alcohol or detergent wash of a level half cup of bees (~320 bees), or the “sugar shake” – I recommend the alcohol wash over the sugar shake. Learning to do an alcohol wash is so important, that I’m going to go into detail as to how to do it!
How to Perform an Alcohol Wash
First, build a mite wash cup set. For details, see these links: An Improved mite washer and Still improving.We hate to see the bees that we sell die from neglect, and are happy to give you a prepared mite wash cup as above any time–just ask when you come by.
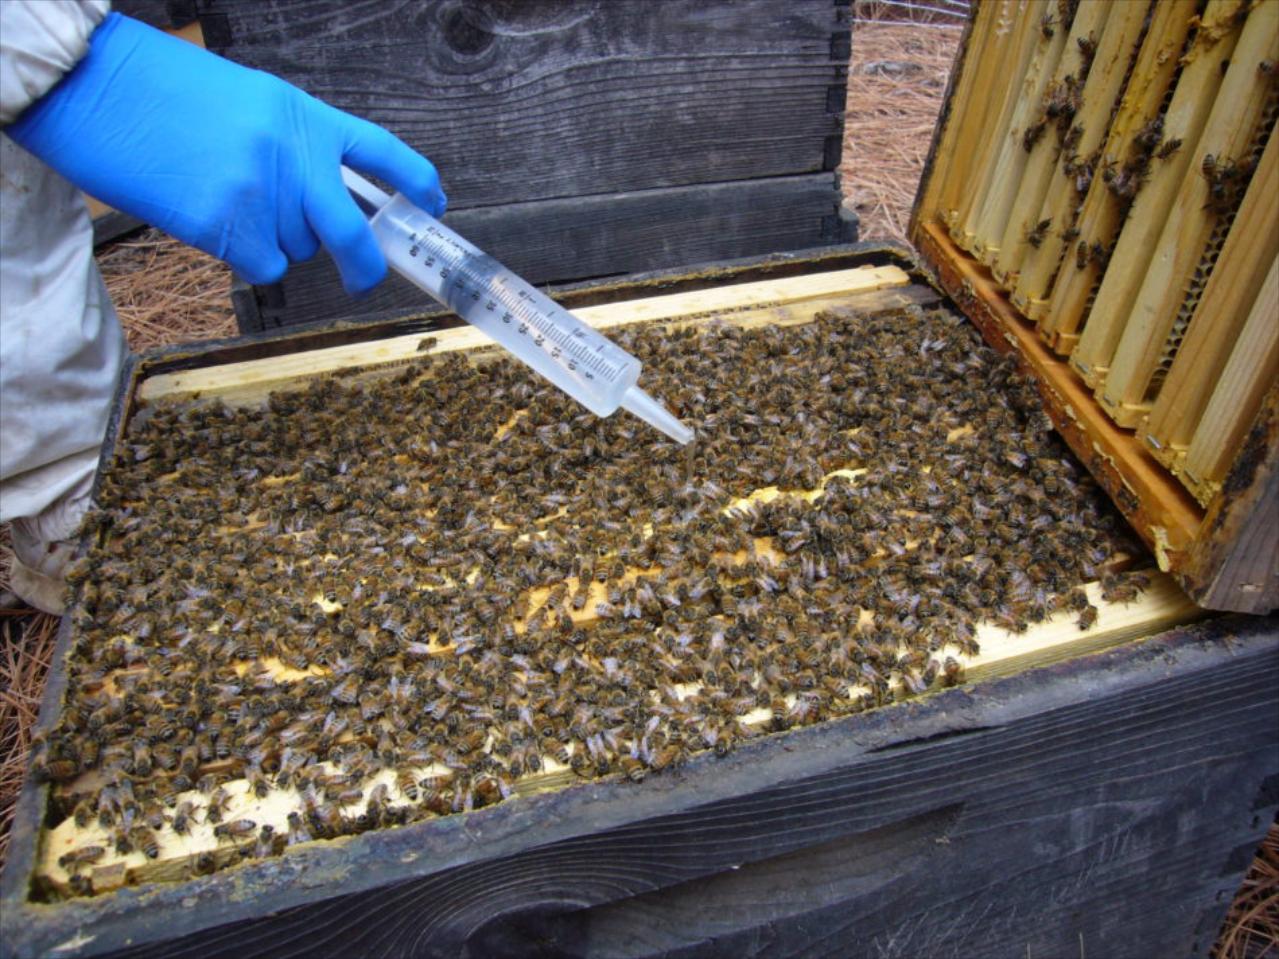
Fill the cup about 3/4ths full of rubbing alcohol.
Shake the bees off the frame into the tub–one frame’s worth of bees is usually plenty.
Now say the magic words: “Old bees fly off!” The older bees will immediately respond to your command and fly home, leaving only the nurse bees, which will briefly spread into a single layer, in which it is easy to spot the queen, should you have accidentally collected her.
Although noisy, the bees flying off are not in any way inclined to sting–we do dozens of these shakes a day, and never have a bee attempt to sting us.
At this time clearly explain, “I’m calling for 300 brave workers to sacrifice their lives for the good of the colony” (this give any unwilling bees a last chance to fly off). The reality is, that from midsummer on, a typical colony of bees is losing more than 1000 workers a day to natural attrition, so a 300-bee sacrifice is a small price for a colony to pay in order to be saved from varroa.
At less than 2 mites per 100 bees (6 in an alcohol wash of 1/2 cup of bees), virus transmission by mites is not a major issue. At 5 per 100 (15 in a wash), some viruses begin to go epidemic. At 15/100 (45 in a wash), colonies generally start to go into a death spiral. There are roughly 82 mites in the photo below. This is not at all unusual for me to see in hobby beekeeper hives in late summer. This colony looked fine, but will collapse before midwinter. With this many mites, it already is suffering from a raging virus epidemic, and is nearly impossible to save.
The most important times to sample are early spring, and then regularly between August 15 and the onset of winter.
Treatments for varroa control
Suggestion #1: Be proactive rather than reactive! It is far easier to keep the varroa level down from the start, than to later attempt to bring it down once the mites have overrun the colony.
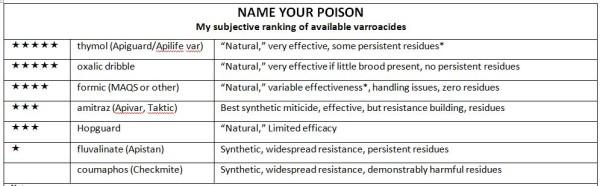
In California, with our long broodrearing season, depending upon how resistant your bee stock is to varroa, it will generally require 2-3 90% kills of the mite per season to keep it under control. I suggest that you ignore much of the information on the internet, and use the well-proven effective treatments detailed below (most are approved for organic production). FWIW, although the essential oils sound attractive, bees as a rule do not like them, and they are stressful to the colony, as well as (other than thymol) exhibiting poor mite control.
We have very good success with Apiguard gel (thymol) or MAQS (formic acid). I also recommend a 3.5% oxalic acid dribble (applied accurately) before Christmas (Northern Calif). I’ve detailed your seasonal choices for mite treatments below.

Top Bar Beekeepers
The varroa mite does not care that you’re keeping your bees in a top bar hive–colonies in top bar hives are just as susceptible to the mite. Unless you are running a truly mite-proof bee stock, you can expect the same sort of buildup of mite populations as in Langstroth hives in late summer, and I have seen plenty of top bar deadouts with clear signs of mite overload.
Top bar hives make mite management a bit more difficult, but can be done.
Notes:
All miticides are poisons, but some are safer than others to both the bees and to humans. The “natural” treatments are all part of our normal diet, and most are naturally found in the hive at low concentrations. I do not hesitate to use them, since the benefit of controlling varroa far outweighs any health concerns to the bees or their keeper. That said, the natural treatments are all stressful to the colony, so application instructions must be carefully followed. Proactive treatment allows you to use lower (and less stressful) doses.
The “natural” miticides
These organic acids and essential oils are approved for organic certification. Although more difficult to use than the synthetic miticides, they leave little or no residues in the combs. These are all that we have used in our operation since the year 2000. That said, Apivar strips (scroll down) are very effective for those wishing the easiest mite management.
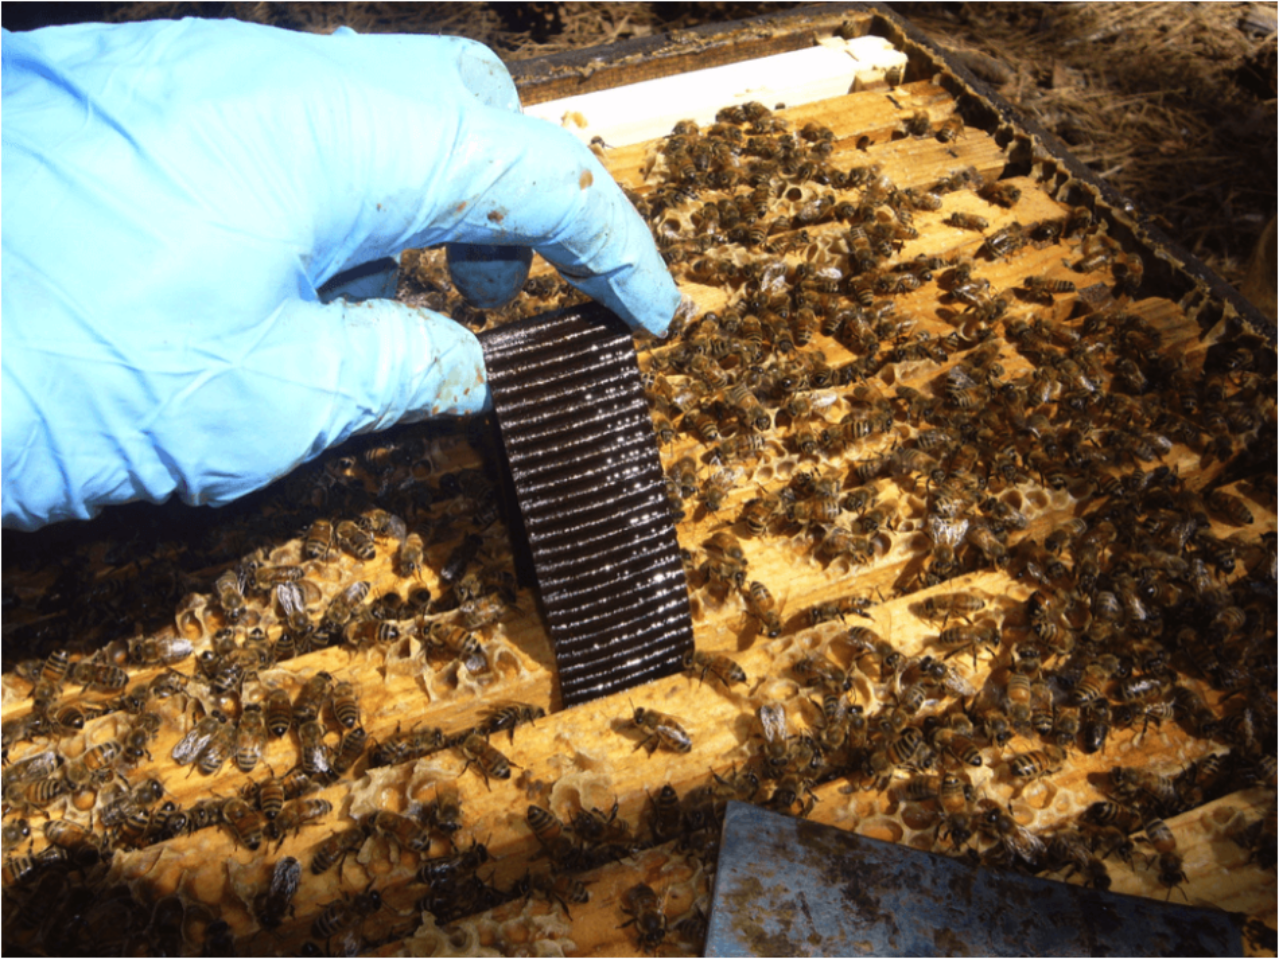
Thymol: Natural and safe (25 g of Apiguard gel contains the same amount of thymol as does 1 lb of fresh thyme herb). Thymol is the only consistently effective essential oil (actually a crystal at room temperature) found to date. I suggest wearing disposable gloves (to remind you not to rub your eyes) . We’ve used Apiguard successfully from 55°F to 95°F, applying 25 g (in a lump, not spread out) on an index card laid across the center of the top bars between the brood chambers (application without the card can result in excessive colony disturbance). We adjust the dose according to cluster size and temperature—the proper dose will cause the removal of a handful of pupae onto the bottom board by the next morning (the colony will remove them from the hive soon afterward). I do not recommend applying under the lid, especially in hot weather. Repeat in a week to 10 days if mite count is not reduced adequately. Do not apply if honey supers are on.
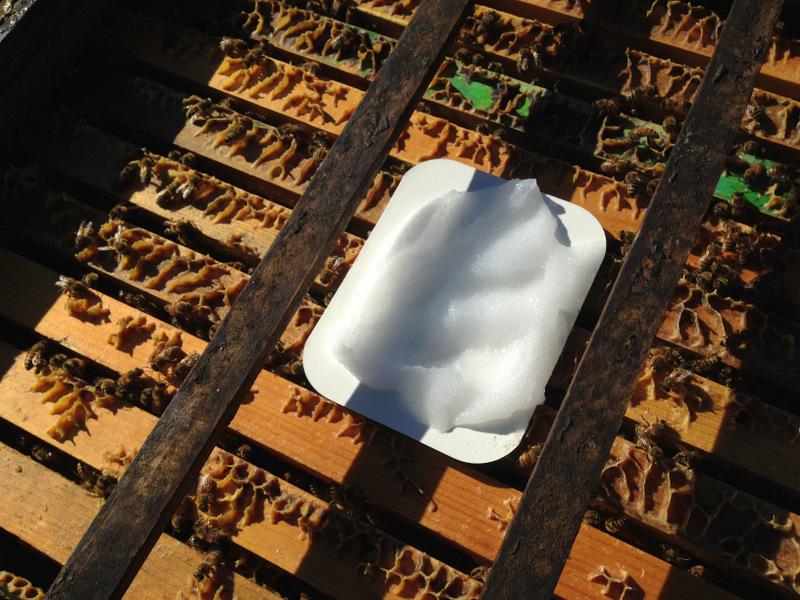
Above is 50g of Apiguard thymol gel being applied in a 1-1/2″ rim. Hobbyists can purchase it in 50-gram aluminum tins. This is a very effective late-summer treatment in the foothills, once you’ve pulled the honey.
Update 2016: recent tests of mine are showing better mite control by applying two 50-g doses of Apiguard, 10 days apart, on top of the hive (as per mfr’s instructions) in a 1.5″ wooden rim (to provide better air circulation around the thymol). This works very well at daily high temps around 85F, and can be used up to 105F (but the colony will be somewhat stressed during treatment). We do not taste thymol residues in the honey after treatment, but the label calls for it not to be applied with honey supers on. We get high efficacy with two 50-gram doses applied 10 days apart. We get great results with Apiguard in August or September.
Thymol treatment causes the bees to move the broodnest and reduce broodrearing, but after the 20-day treatment, the colony immediately recovers.
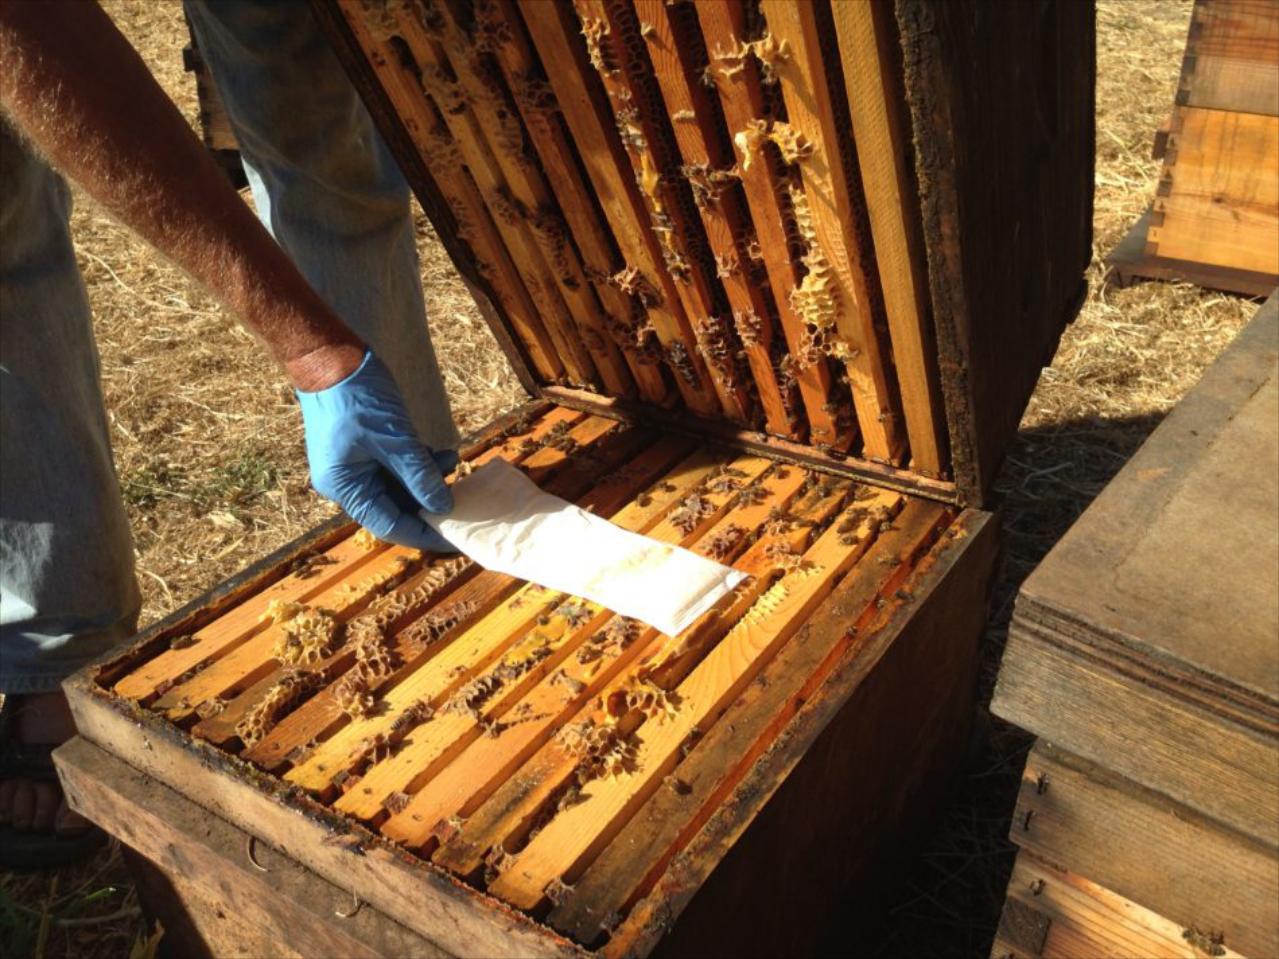
Formic acid: Natural and pretty safe, depending upon how you handle it (definitely wear nitrile gloves; the respirator is generally unnecessary). The three main advantages of formic are that it effectively kills mites, is already a natural component of honey, and that it leaves zero residues in the hive. The problem is that the liquid form is somewhat dangerous to handle, and getting an appropriate release of vapors is tricky. The product Mite Away Quick Strips (MAQS) is the most user friendly. Works best in doubles without supers. A single-strip treatment gives decent mite “knock back.” A half strip works for singles with at least 5 frames of bees. Applied in doubles at full dose (two strips) in summer, we lose about 1 queen out of 25. Mite kill may not be consistent, so check back. MAQS may cause the loss of poorly-performing queens when applied at daily high temps above 85F.
Applying a single MAQS. We use this for mite knock back while honey supers are still on.
Tip for hobby beekeepers: to avoid queen loss, temporarily remove the queen from the hive during treatment– to a cage indoors, or to a two-frame nuc. Then you can blast the hive with formic for an effective mite kill, and return the queen after treatment (after 24 hrs with formic flash, after 5 days with MAQS).
Oxalic dribble: Natural and safe (the amount used is equivalent to that in a 3½-oz serving of spinach). This product is available at any hardware store as Wood Bleach. Follow the mixing directions exactly, as there is only a small margin of safety to the bees. The oxalic syrup is very safe to handle, but care should be taken not to splash it into your eyes. The treatment is by far most effective if the colony is broodless. Best use is for a single application in November, or earlier if the colony has shut down broodrearing. You can also apply in summer—3 applications, a week apart. Excellent for “cleaning up” nucs in the spring.
Applying oxalic acid dribble, an easy way to control varroa, provided that there is very little sealed brood in the hive.
Others are using oxalic vaporization, which can also give very good results, but has operator safety issues–be sure not to breathe the vapor!
Hobby beekeepers can create an induced brood break by caging the queen for 12 days, then releasing her, and treating the hive with oxalic dribble or vapor 6-7 days later (day 18-19 after first caging). This is a very inexpensive and effective way to control varroa.
Update May 2017: I’m currently testing OA/glycerin extendend release towels, which appear very promising.
The Synthetic Miticides
Amitraz: Commercial U.S. beekeepers have used the agricultural product Taktic, generally mixed with oil or shortening, for a number of years with consistent success (although this practice is illegal). Apivar strips are an improvement, being legal, as well as delivering a reduced and safer dose over 42 days, resulting in high efficacy of kill, and fewer residues in the hive. The strips, however, do not cause a quick kill, so may be most effective in either spring (applied at least 42 days before the honey flow), or in fall if mite levels are not too high, and there is enough time before cold weather sets in. I gave Apivar only three stars since it does leave a residue, which recent studies suggest may affect sperm viability in the queen and have other sublethal effects on the bees, as well as the EPA’s legitimate concerns about its safety to humans. There is also evidence that some mite populations have developed resistance to the active ingredient.
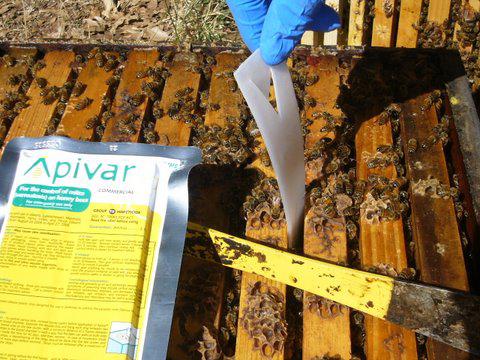
Apivar is applied at the rate of one strip per 5 frames of bees. It is slow-release, and requires 8 weeks for full efficacy, so is best used in springtime. This synthetic miticide is also used in tick collars for dogs. It is effective, especially when applied in the spring (a single strip is great for nucs or packages, and exhibits few adverse effects upon the colony.
Fluvalinate and Coumaphos: These first-generation synthetic miticides (along with the off-label use of agricultural products containing the active ingredients) quickly bred for resistant mites, and contaminated the entire U.S. beeswax supply. I cannot recommend their use.
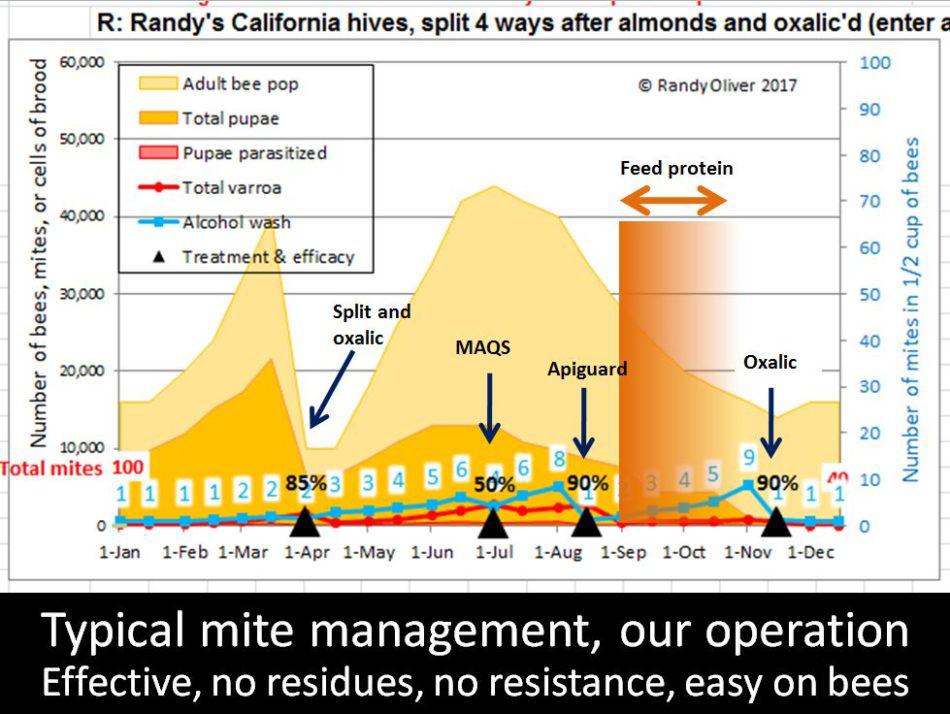
Our typical mite management regime in Grass Valley is as below:
Back to the hive: adding another brood chamber
Once the bees have drawn out all the combs in the first brood box, you can add the second brood box (you may wish to add a drone frame for mite trapping).
Do not mix drawn combs with the foundation; just add 10 frames of foundation-this will produce the straightest combs.
We have our best luck at drawing foundation by adding full boxes of 10 frames directly over the brood of strong (at least 10 frames covered with bees) growing colonies during a strong nectar flow.
Keep feeding the colony until all the combs are drawn out. At this point, the brood chamber is complete (assuming a double deep brood chamber), and you should discontinue feeding.
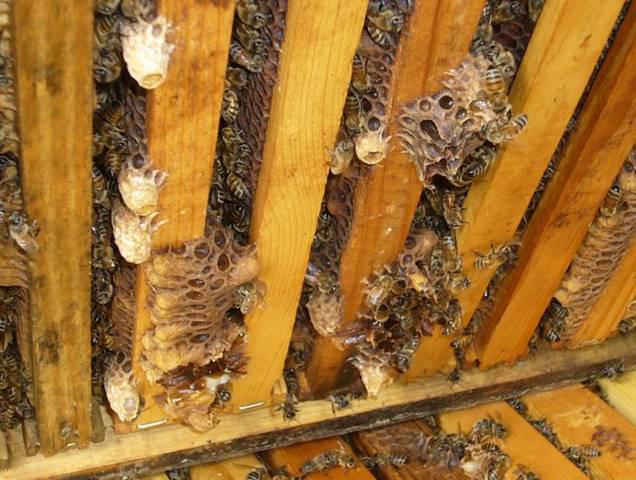
A healthy colony will often create drone comb between the two brood chambers in spring. Always check such exposed brood immediately for the presence of varroa, as it is a decent indicator of brewing problems.
If the colony fails to move up onto foundation in an added box, it is generally due to a lack of nectar flow. In that case, keep feeding sugar syrup. Bees will not draw foundation unless they are “whitening wax” due to intense feeding or an intense nectar flow. It takes a minimum of 2 gallons of heavy syrup to draw the wax on 10 deep combs, and another 5 gallons to fill them with sugar “honey” for winter stores.
Adding Honey Supers
Once the colony has filled two brood chambers (this may not occur in your first year), you can then add a queen excluder (I highly recommend) and honey supers.
Don’t bother adding foundation unless you see white wax. But always add more combs if you do!
Queen Excluders
Bees do not like to draw foundation placed above an excluder (not a problem if you are adding drawn comb, which you will unfortunately not have available your first season). To encourage bees to work through the excluder, I suggest “reversing” the brood chambers if there is a band of honey across the top of the upper combs. This maneuver will place brood directly below the excluder, which encourages the bees to work upward.
Keep in mind that bees will not draw foundation unless they are producing white wax. This rule applies even more emphatically if you are trying to get them to work through an excluder onto foundation.
There is a major advantage of keeping your honey supers free of brood cocoons–wax moth cannot grow on stored “white” combs free of brood cocoons or beebread (not enough protein). By using queen excluders, you can keep your honey combs free of brood cocoons, and thus eliminate the storage problem from wax moth.
Getting a Taste of Honey
OK, you may not get a full honey crop your first season, but you can at least steal a little from the bees so long as you replace it by feeding them heavy (2:1 sugar:water) syrup before cool weather sets in.
Let’s say that the first brood box is full, and now the honeyflow is starting, and you’d really like to get a little honey the first year. Just put on the second brood box, and stop feeding syrup. Let the bees work up and fill the box with brood and honey. Once the honeyflow’s over (usually once blackberry stops blooming at the end of June), you can pull out frames of honey and do a “scrape extraction.” Use a tablespoon to scrape the honey off the foundation into a nylon stocking hung in a gallon jar, then return the scraped frame to the hive, and resume feeding until the bees draw it out again. They will winter just fine on honey made from sugar syrup.
Supering your Hive for Honey Production
I love queen excluders–they allow you to keep the queen out of your honey supers. The world’s largest crops of honey (in Australia) are all produced through queen excluders.
One of the most common complaints is the “my bees wouldn’t go through the queen excluder to draw foundation.” Bees won’t do so until every single cell of drawn comb below the excluder is full of nectar–only then will they work foundation, and as I mentioned above, they won’t draw foundation unless there is a very heavy nectar flow on. Bees also are adverse to crossing a solid “honey band” below the excluder. A Tip: you can encourage them to move through the excluder by rearranging your brood boxes or frames so that there are frames of brood right up to the queen excluder.
Late-Summer Management and Varroa Control
Your colony will generally reach its maximum size around July 1, and get somewhat smaller during the late summer and fall. In the foothills, there is typically a pollen dearth from early July through October, and the colony will minimize its broodrearing. This is good, since it reduces varroa reproduction. Use this window of opportunity to control varroa in August (Apiguard thymol gel works very well).
After you’ve got varroa under control, you may then wish to provide the hive with high-quality pollen sub as below:
Winter Preparation
Colonies winter best (in the foothills) in two deep brood chambers or equivalent, with a total weight (mainly due to honey) of about 130 lbs (you need at least two fingers to tip the hive). If the hive is not heavy by the end of September, feed heavy sugar syrup until it is.
If your apiary is located in a dry area of the foothills, there may not be enough pollen to sustain late summer broodrearing – colonies in these areas greatly benefit from late summer feeding with pollen supplement. Any of the top-tier pollen supplements work–if you don’t see pollen beebread in an arc above the brood, the colony is likely hurting for protein. We typically feed each colony several pounds of pollen supplement during August through October. This may not be necessary if you live in town or in an irrigated area.
The best indicator of protein status is how much jelly the nurse bees are feeding to the young larvae. Larvae fed generously with jelly are called “wet brood.”
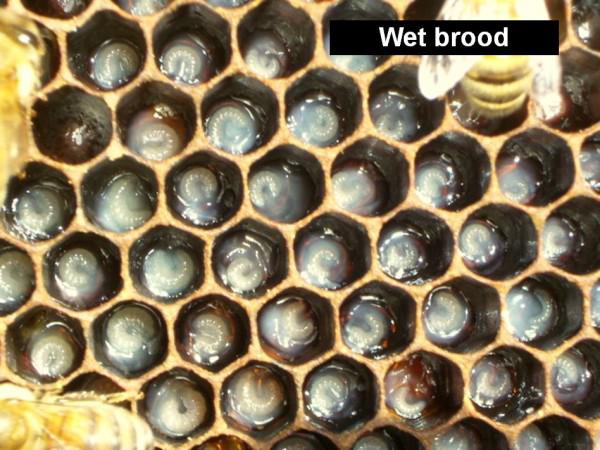
When a colony suffers from protein deficiency, the nurses will cut back on the amount of jelly that they feed to larvae. See the photo below for “dry” brood.
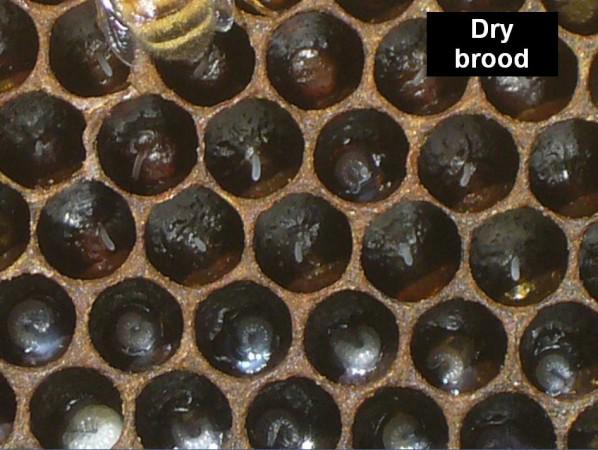
There are eggs in the center cells; larvae being given minimal jelly in the cells below. When we see such “dry” larvae, we immediately feed patties of pollen substitute.
There is a trade off regarding the fall feeding of your hives. Colonies that are strong and well fed in fall winter well, but will then also be strong in spring. They will then want to swarm. Escaped swarms later become “mite bombs” that will come back to haunt you. So if you build your colonies up by feeding, please then manage them to prevent swarming the next spring–this will help the beekeeping community overall.
Rust fungus spores
Be aware that in the Sierra foothills, in late summer the bees may be tricked by a fungus into gathering their spores instead of nutritious pollen. The blackberry rust fungus produces sweetened fluorescent-orange spores that the protein-desperate bees will gather and store as beebread–below:

This bright orange beebread consists nearly entirely of rust fungus spores. Colonies quickly go downhill on this diet–note the spotty brood pattern. Don’t let this beebread fool you! If we see this occurring, we give the hives two rounds of 2-3 lbs of high quality pollen sub:
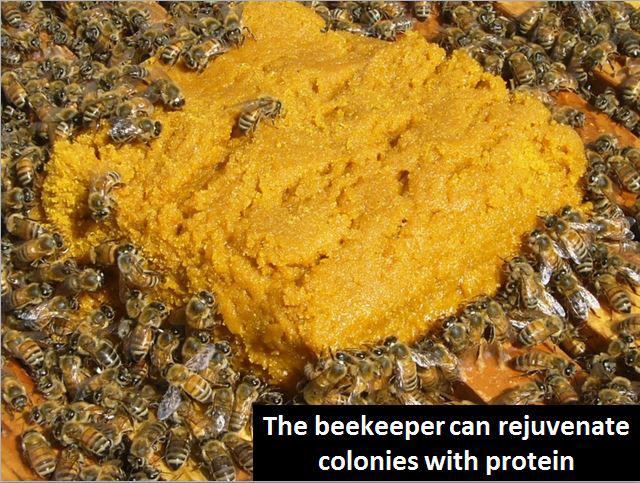
If you live in town, there will likely be enough pollen to keep your colonies healthy during late summer. On the contrary, in dry rural areas, colonies can go downhill due to lack of pollen (and especially if they are gathering rust fungus spores). Feeding pollen sub (above) can rejuvenate those colonies. But be aware that its a trade off–increasing broodrearing also increases varroa reproduction.
It takes a fair amount of pollen sub to provide enough protein–about one 1-lb patty per week (you can feed several pounds at one time if you don’t have Small Hive Beetle in your area).
Winter Prep
Winter prep consists of having the hives off the ground and in a well-drained sunny location. It helps to reduce the entrance. A well-prepared colony (well fed, and low mite level) should need no care during the winter, and will begin to rebuild its population in January. An insulated cover (such as with 1″ of Styrofoam) will help the colony.
Next Spring and Splitting
Most strong colonies will attempt to reproduce in spring by swarming.
If you lift the upper box of the broodnest of a colony preparing to swarm, you’ll typically see swarm cells hanging from the bottom bars as shown above (but there may well be swarm cells elsewhere in the hive). The old queen and a swarm may leave any time once the first cells are sealed.
There are management techniques than can be used to minimize the cues that initiate the swarm impulse. One of the most effective techniques is to simply split the colony. You can split a strong colony in half, or make up to 5 nucleus hives from it. However, keep in mind that there may be a tradeoff between later honey production and “making increase.” Ideally, you’d remove only enough bees to avert swarming, but leave enough for the colony to recover its maximum population just in time for the start of the main honeyflow in your area.
There is also the issue of how to provide queens to the splits–some methods result in a very long break during which the colony will have no emerging adult bees–see the table below:
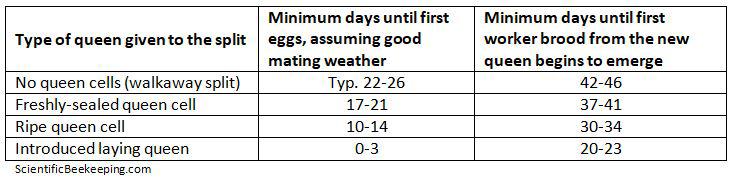
In general, the more brood that you can put into a split, the better (the amount of brood is more important than the amount of adult workers). Typically, make your splits with at least 5 frames of bees, a ripe queen cell, and a minimum of 2 full frames of brood. But such a split may not make a honey crop in the first year. The same split made with 4 full frames of brood and a laying queen, on the other hand, can well grow quickly and make a honey crop, if immediately given plenty of drawn comb, and fed some sugar syrup.
You can kill three birds with one stone each spring–preventing swarming, requeening, and mite control. See the graphic below:
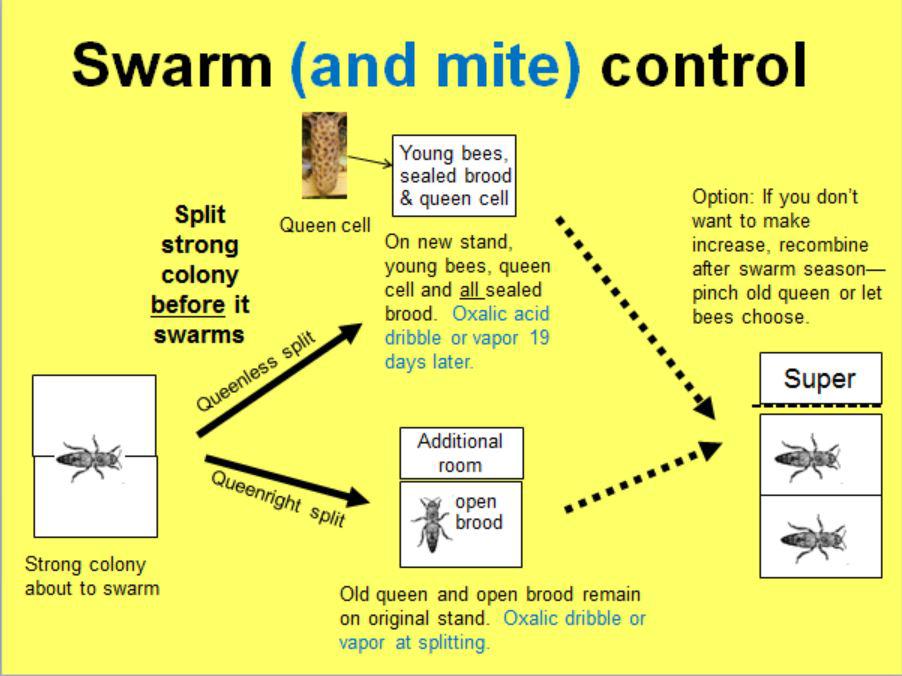
By splitting your colony when it is thinking of swarming (by using either a natural swarm cell or a purchased one), you can use oxalic acid dribbles (at different times) to nearly eliminate varroa from the two splits (by creating induced brood breaks). The small-scale beekeeper can easily manage varroa by using the above or similar creative methods of creating brood breaks.
Miscellaneous
Read all about beekeeping, but remember that there is no substitute for hands-on experience in the beeyard with an seasoned beekeeper. Find a mentor in your area. The easiest test for choosing a mentor is to find someone who consistently has extra bees for sale each spring (not necessarily the one who is most strongly opinionated).
Getting a colony of bees is not like getting a puppy–you expect the puppy to live to old age; this may not be the case with bees. In nature, a large percentage of colonies die each year. Even the best beekeepers may have a third of their colonies die in some years. It helps to keep more than one colony, so that you can split it in spring to make up for losses.
Good luck with your new colony—I hope you have great success this year! If you have suggestions as to how I can improve these instructions, please let me know!
Reprinted with Permission from Randy Oliver.